Convert Your Mower Into A Survival Generator
Spring is in the air and with it comes yard work. For some we have already started planting our gardens, others are tending to their chickens and most have to start cutting the grass. I know you may hear the Home Depot song playing in your mind as you think of mulching and planting and sprucing up after winter’s snooze but I have already been cutting my grass and it is due again for another visit with the lawnmower.
As I started to think about getting out there and cutting the grass, I wondered if there would be a use for items like my trusty lawnmower when the grid goes down. Why? Because if you are like me, the last thing you are going to worry about is a nicely trimmed yard. Heck, we all might need to tear up the pretty green carpet to make way for additional garden capacity and if that happens, what could we do with that mower? Even if we didn’t have a grid-down emergency what other purposes could our mower serve?
You will need the following tools/parts:
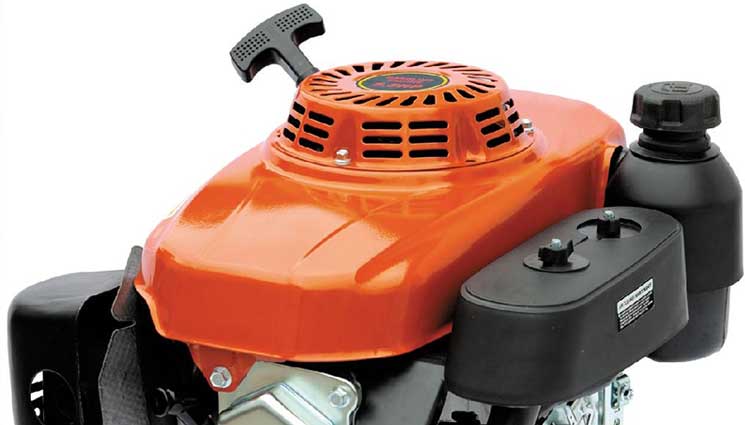
Lawn Engine motor
The generator project will require a vertical shaft gas engine from a lawn mower. The typical lawn mower engine will be 3 to 5 horse power and will have a 7/8″ shaft, with a 3/16″ key way and a threaded hole in the bottom of the shaft. Most of these engines have either 3 or 4 bolts holding them down to the existing lawn mower base.
Alternator – A GM 10SI or 12SI style automotive alternator.
The alternator will fall into one of three categories:
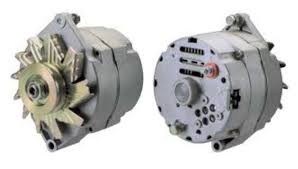
A) External voltage regulator type.This type of alternator does not have an internal regulator and must have one connected externally to control the alternator field intensity and thus the output voltage and current of the alternator. The disadvantage in using this type of alternator is that connection is a bit more complicated and the regulator is an added component that must be mounted and connected properly. This type of alternator is typically less expensive than the other options shown below, but like the model with an internal regulator, it too requires an external on / off switch or the alternator and regulator pair can discharge batteries when it is not charging and the switch is left on.
B) Single wire connection type with internal regulator.The single wire connection type alternator automatically starts producing output power when the RPM of the input shaft reaches a minimum speed. And, when the RPM drops below a preset speed the output stops. A big advantage is that it does not require a switch to isolate the alternator from the battery source to keep the alternator from draining the battery when not in use. The disadvantage in using this type of alternator is that the alternator will start to charge the batteries as soon as the minimum speed is reached, and will place a load on the engine as soon as the minimum RPM is achieved. In some cases, you might need to throttle through this minimum RPM range to insure that the motor does not bog down at low RPM when the alternator begins to produce power. Another disadvantage is that these alternators are more expensive than other options, but it provides a very simple connection method.
C) Internal regulator type with external control switch.Another option is to use the type we used on our last project. This alternator has an internal voltage regulator but requires an external switch to start or stop power production. The advantage in using this model is that the alternator can be switched off while the motor is still running and power output stops. This aids in connecting and disconnecting batteries or other loads.
One note in the Single wire connection type with internal regulator:
We found that the single wire configuration is not ideal for this application. Because the lawn mower engine mentioned above doesn’t have much throttle adjustment, if a single wire configuration is used with a 2 1/2 inch pulley on the motor the alternator doesn’t kick in without manually moving the throttle butterfly to a higher setting and then releasing. This problem might be eliminated by using a 3″ pulley. However, a single wire configuration can be used on our last project using a horizontal shaft engine. The problem we have right now, is that we don’t have all the answers yet for this configuration. Feel free to experiment, but with the motor we used and the pulley we used, it wasn’t convent in that you had to reach under the carburetor to throttle up manually to start generation.
Electrical Wires – Think wire harness for your car battery

A positive and a negative car battery cable is needed, as well as an alternator connector and associated wires. The alternator wires are not needed if a single wire alternator with built in regulator is used.
A belt – An A Style Industrial Belt to be more precise

The V-Belt transfers power from the pulley (which will be mounted) on the motor to the pulley on the alternator. Various belt lengths can be used if your mounting system provides for several inches of belt length adjustment. Keep in mind that the belt length should be kept to a minimum to reduce belt slap and associated wear.
We have found that the Automotive V-belt used on a standard alternator is not compatible with the industrial “A” size belt that mates with all pulleys you will find for the motor. However, if you use an industrial “A” style V-belt, it will provide an exact fit for the motor and an “OK” fit for the alternator. Replacing the pulley on the alternator to match the pulley on the motor is an option (a more expensive option) but would be the ideal solution.
Cast Iron Pulley
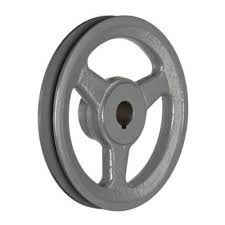
The motor pulley needs to be high quality cast iron. The mass of a cast iron pulley tends to act as a flywheel, taking the place of the mass of the lawn mower blade. Remember that most lawn mower engines have a very light aluminum fly wheel and use the steel blade as part of the effective fly wheel mass. The added weight of the cast iron pulley (compared to the mass of an aluminum pulley) helps the engine idle smoothly and helps keep belt slap to a minimum.
Mounting Bracket
The mounting bracket is the most complicated part of the project. The great thing about the bracket is that it’s Universal in design and allows use of a wide variety of engine manufacturers and engine models.
It not only eliminates hours of time figuring out the bolt pattern of your motor, but also eliminates the trial and error guess work in finding a belt length that will work once the motor and alternator are mounted. Additionally, the bracket can be bolted down to a simple base of your own design and the rest of the work is done!
Detailed instructions on how to work on this project:
The first step is to remove the motor from the lawn mower base. Typically, there are 3 or 4 bolts holding the motor to the base, but before you remove them, you will need to remove the mower blade and the shaft coupler that holds the blade on the motor shaft. Getting the blade and the coupling off is a bit of a pain. Removing the blade is not nearly as difficult, but still requires a bit of ingenuity to figure out a way to “jam” the blade so it won’t rotate while you remove the bolt which holds it in place on the motor shaft.
We found that we had to use a “pulley puller”, to remove the shaft coupler after the mower blade was removed. A “pulley puller” which can be rented or purchased at most auto parts stores. Removing the coupler is difficult to impossible without use of this tool.
The next hassle will be in finding the required pulley. Our research indicated that nearly all the motors used in vertical shaft lawn mowers have a 7/8″ shaft, and a 3/16″ or 1/4″ key way. However, horizontal shaft motors under about 7 HP use a 3/4″ shaft. The 3/4″ pulleys can be found at most hardware stores, but the 7/8″ pulleys are impossible to find. What we had to do was to set up an account with a company that supplies Heating and Air Conditioning Systems, Motors, Blowers and Components to be able to order the correct pulleys.
Another catch is that a 3/16″ key way is not standard on cast iron pulleys. What we found was that a 1/4″ key way is the norm because most high horse power AC motors use a 1/4″ size key way. A pulley with a 3/16″ key way is not typically available in a 7/8″ shaft diameter configuration. It is possible to use a pulley with a 1/4″ key way on a motor that has a 3/16″ key way provided that the set screw is on top of the key on the motor shaft and NOT on the shaft itself. If close attention is paid to this detail the pulley will stay in place without vibrating or loosening.
The biggest problem is figuring out how to bolt everything together. Because each type of mower had different a base, we ended up concentrating on coming up with a universal base that just about any motor could fit on. Our base had to allow rotating the motor by about 30 degrees, and allow positioning the motor in any of the 90 degree quadrants. That allowed the motor to be in any position with clearance for the alternator and a method for hooking up the belt. We also wanted to allow the alternator position to be adjusted allowing for several belt sizes to be used. The bracket also has an integral belt adjustment slot which allows the alternator position to be adjusted, which also serves to tension the belt.
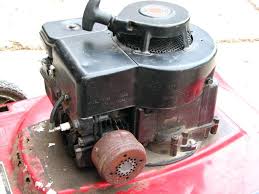
The lawn mower engine
The lawn mower we used had a 3.5 Horse power Briggs and Stratton 4 stroke gas engine. That particular model motor has a safety shut off lever on the lawn mower handle which has a cable attached to the motor, and the attached cable must be activated to disengage the motor shut off break and to allow spark to reach the spark plug. What we decided to do was to cut the cable off and deactivate the motor shut off feature. If your motor has this feature, you will need to spend some time looking at the cable and the levers on the motor to figure out a way to deactivate or preserve the feature. In either case the motor will not start unless something is done about the cable and levers.
We found that there was a small hole in one of the lever plates on the side of the engine, and after pulling the cable, a small nail can be inserted into the lever to keep the mechanism from retracting and shutting off the motor. Like I said, it will take a bit of time to figure out how your motor shut off mechanism works (if there is one installed on your motor).
Most of the lawn mower engines you will find have a 7/8″ shaft and a 3/16″ key way cut into the shaft. They also have a threaded hole in the bottom of the shaft.
Pulley Size and Type
The vertical shaft motor from this lawn mower would not throttle as high as the same horse power motor we used in the horizontal shaft generator project. That motor was from a lawn edger, and could be set to a higher maximum speed. After talking with some lawn mower experts, we were told that the throttle mechanism on the lawn mower has the maximum throttle set to be about 75% of the maximum butter fly valve position of the carburetor. We were told that the lawn mower manufacturers set the throttle mechanism that way so there is extra throttle capability for when the mower hits some heavy or wet grass. The motor could then self throttle to a higher setting if necessary, then throttle back to the pre set throttle setting.
The reason we mention all this is that the pulley size we used on the horizontal shaft motor project would not work on this project. In testing this motor with the throttle set as high as possible without modifying the carburetor, and using a 4 3/4″ pulley on the motor (similar size to the one on our other project), the motor would bog down and die with a 39 Amp load on the alternator. Without modifying the carburetor, we couldn’t keep the thing running when the load was switched in with the large size pulley.
We had excellent results with a 2 1/2″ pulley. It allowed the alternator to output voltage at even half or lower throttle settings at a slightly lower output current. So, with less than full demand, the motor speed could be reduced without killing the motor, and providing fuel savings.
Mounting the Motor and Alternator
Mounting all this stuff is the tricky part of this project. But to make things easy, we designed and manufactured a bracket to make the task simple.
The bracket is made from 1/8″ steel and has provisions for mounting the motor and alternator, and additional holes for mounting the plate to a base of your own design.
What we did for the base was cut two 2×4’s the length of the bracket, and another 2×4 as a cross brace to be installed under the bracket at the bottom of the long 2×4’s. Imagine the base as being an H. The two long pieces were installed so that the base was 4 inches in height, and the cross brace was installed on the two length wise 2×4’s at the bottom, and on it’s side so that it stood 2″ in height. That provided the necessary clearance for the belt and provided stabilization of the two side pieces. A further improvement would be to install two more short 2×4 at each end of the assembly to completely box in the rotating pulleys (for added safety).
We elected to mount the alternator in such a manor that it actually runs backwards. This simplifies the hook up and it still works. The fan still functions, but instead of pulling air through the back and exhausting through the front, the air flow direction is reversed. Also, the fan blades are not as efficient when running backwards so air flow is reduced slightly. But, remember that like in the other project, the alternator is mounted to a steel plate which also serves as a large heat sink. And from the two hour test run at 39 Amp output, the alternator case temperature was only 148 degrees (ambient temperature was 80 degrees). So, I guess what I’m saying is that it really doesn’t matter. These alternators normally spend most of their lives under the hood of cars stuck in traffic jams on hot days, and see temperatures much higher than this.
Now, getting back to the mounting issues: The lawn mower engine has a longer shaft than the alternator, and if the pulley is installed in the ideal location on the motor shaft the two pulleys do not align. So, what we found was that the alternator needs to be mounted flush on top of the bracket but the motor needs to be spaced 1″ above the mounting plate. This is easily carried out by using 1″ longer bolts, and 1″ long spacer tubes. Then the alignment of the pulleys is correct.
Wiring it up
The wiring depends on which alternator you choose. All three alternator types are shown.
Do not wire the alternator unless you are sure about what type you are using. If you make a mistake in the selection of the alternator or wiring diagram you run a very high risk of damaging your battery, electronic devices, or worse yet causing personal injury! Consult a parts professional for additional information!
This tip is intended for educational purposes only. No guarantees are expressed or implied as to the accuracy of information presented here! Consult with an automotive wiring expert before attempting to carry out any wiring.
If you are using an alternator that requires an external switch, you will need to turn off the switch prior to attempting to start the generator. If the switch is on, the generator will try to output voltage while you are pulling the starting cord on the motor. You will find that it will be nearly impossible to pull the cord! If the switch is off, then there is little to no resistance from the alternator. Once the motor is running, the switch can be set to the on position.
Other self-sufficiency and preparedness solutions recommended for you:
The vital self-sufficiency lessons our great grand-fathers left us
Knowledge to survive any medical crisis situation
Liberal’s hidden agenda: more than just your guns
Build yourself the only unlimited water source you’ll ever need
4 Important Forgotten Skills used by our Ancestors that can help you in any crisis
Secure your privacy in just 10 simple steps
Spring is in the air and with it comes yard work. For some we have already started planting our gardens, others are tending to their chickens and most have to start cutting