
Being the not-so-proud resident of a city that has more issues than a high-school teenager, electrical the most part, I was kinda forced to go full MacGyver on a lot of stuff. Sure, I don’t mind opening the tap only to see muddy water or realizing that I can’t take a shower before going to work because some neighhbor shut off the main line to install a new sink, but I really go berserk each time the power goes out. Never mind the fact that I can’t use my PC, but, apparently, I’m the only around here who has to remind the others about keeping their damned smartphones charged at all time. Anyway, seeing that the authorities aren’t lifting a finger to find a more permanent solution to these blackouts, I began searching for ways to power up and\or charge my electronics.
Of course, one doesn’t need a degree in physics to figure out that most of the tips you find online are not only BS, but dangerous as well. So, after snooping around for a bit, I came across this pretty ingenious and simple way of charging any kind of phone battery using stuff lying around the house. Tried on a couple of my electronics, and guess what – it worked like a charm. Sure, it’s not as efficient as the outlet charging method, but hey. , it works. We do live in troubling times – today, it’s a power outage (if that seems like a trifle, go and check out what happened in Venezuela at the beginning of the month). Tomorrow, it can be an EMP attack. So, having said that, here’s my caveman-style trick of charging any electronic gadget when the power goes out the window.
You will need:
- One 9V Alkaline battery (go for Varta or Duracell if you want extra juice).
- One spring (you can salvage one from an old ballpoint pen).
- A car charger (make sure the car charger has a USB port).
- Your phone’s power cable minus the dongle.
- Tape.
To try this charging method, I’ve used my daughter’s Samsung Galaxy J7 (2016), which has a 3600 mAh battery. Already got the stuff? Good! Here’s what you’ll need to do next.
Assembling the charger
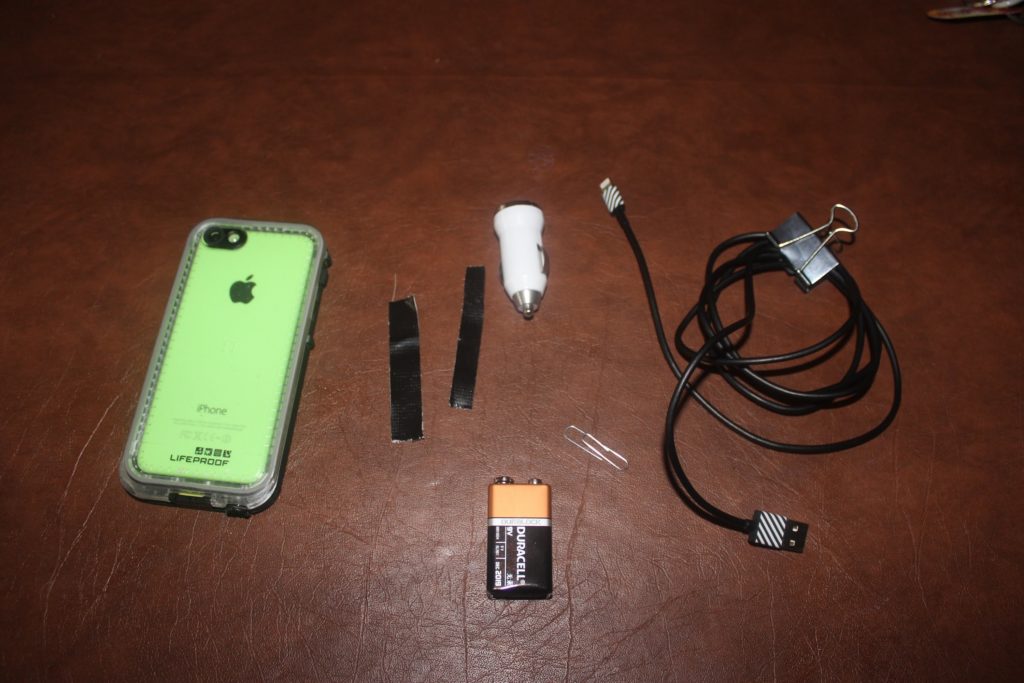
Step 1. Take apart the ballpoint and salvage the string. Don’t straighten it or anything. You’ll need it intact. Step 2. Insert one end of the spring in the battery’s negative pole. FYI, it’s the big one. It’s always the big one. Step 3. While holding the spring end inserted into the battery’s negative terminal, connect the other end to car charger’s positive terminal – it’s the little metallic bar on the side. Step 4. Once the two terminals are connected, use plenty of tape to secure the battery to the charger. Step 5. Connect the charger’s metallic nub to the battery’s positive terminal. Again, tape the shit out of them to prevent them from falling apart. Step 6. Wrap some more tape around the thingamajig. Step 7. Connect your phone’s power cable to the car charger’s USB slot. Step 8. Plug in the phone. Step 9. Charge your phone like a boss!
More on makeshifts phone-charging methods
You know the saying: if it looks stupid, but it works, then it’s not stupid (just ugly). One thing you need to understand is that you won’t get a full charge out of a single 9V battery. The Varta cell I’ve used put out 550 mAh. And considering that the phone has a 3,600 mAh battery, it means that you need around six or 7 batteries for a full charge. Wouldn’t recommend relying solely on bats to get a full charge because you will have to redo the entire process. This method’s great if you need just enough juice to power up your phone to call a family member or 9-1-1 in case of an emergency. 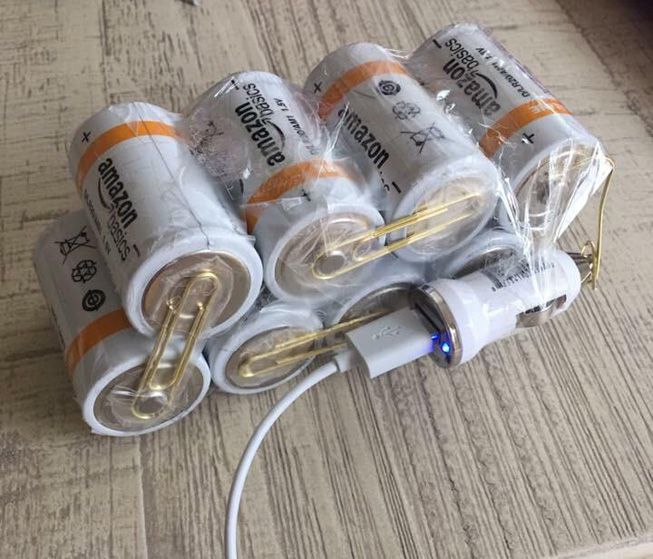
Still, you need to consider that there are different types of phone batteries out there on the market. For instance, my wife has an Apple iPhone 8, which has a 1,821 mAh battery. Obviously, it takes fewer 9Vs to juice up her phone compared to that of my daughter. Careful about these newer models, as some of them might not draw electricity from below-nominal sources. Another charging method which I’ve been trying to try out for months (I think I will use a tablet this time), involves D batteries, paperclips, and, of course, some tape.
Takes a little bit of tinkering though – compared to the method I just showed you, this one is a bit trickier because you will need to arrange the batts in a certain fashion.
To pull this off, you’ll need eight D batteries, paperclips (those without plastic covers), tape, your phone’s cable, and a car charger. Basically, you must arrange the batteries in such a fashion that the negative terminal from the one on top can be bridged with the positive terminal on the bottom battery with a paperclip. Do this on both sides and then use two paperclips and tape to secure the car charger’s positive and negative terminal. Don’t know for sure how efficient this method is, but considering that one D battery has an output of 1.5V, I don’t think it’s really that efficient.
It’s still worth a shot if you have a lot of Ds lying around and no other way to charge your phone. Anyway, I hope you’ve enjoyed my take on going full MacGyver on dying phones. Word of caution though: I wouldn’t try this method to power up a laptop or any device bigger than a small phone or tablet. You can end up damaging the power supply and losing everything inside if you tinker with supplies other than those specified in the manual.
You should also keep an eye out on the device while it’s charging. If you hear a strange, buzz-like sound, disconnect the device immediately. Let me know in the comment section how the method worked out for you.
Other Self-sufficiency and Preparedness solutions recommended for you:
The Lost Ways (The vital self-sufficiency lessons our great grand-fathers left us)
Survival MD (Knowledge to survive any medical crisis situation)
Backyard Liberty (Liberal’s hidden agenda: more than just your guns…)
Alive After the Fall (Build yourself the only unlimited water source you’ll ever need)
The Lost ways II (4 Important Forgotten Skills used by our Ancestors that can help you in any crisis)
The Patriot Privacy Kit (Secure your privacy in just 10 simple steps)


