Home2022August

For when SHTF, we all have our food storage. Without outside interference, some of us can survive on our supply for years. What happens, though, when our supply is threatened by an outside interruption? Hungry neighbors can try to force their way in to steal your surplus food in a desperate scenario.

We, as preppers, are ready for anything. It is nice for storage to have a dedicated space in your basement or root cellar, but it can have easy access to intruders. You would have to start building your surplus from the ground up, again, if a burglar discovers all your food in one place. If people have already resorted to stealing food in this case, that is an expensive hassle.

Instead of having all of your long-term non-perishables in one place, I personally prefer to spread out my food in various hiding locations. I keep a thorough list of my hiding places and what is stored there, in order not to lose track of my inventory. It is also beneficial to have expiration dates clearly marked on the list as well. Keep this list easily available but secured, such as on your tablet or computer, or inside a safe with a physical list.

Not to state the obvious, but when storing, please bear in mind obvious fire hazards. In addition to electrical wires, etc., cardboard or wood boxes of food would not fit well. They should be 100 percent critter-free whether your hiding spots are under floorboards or behind walls. Just make sure that you search your hiding places long before you store them.

Here are some of my favorite unspeakable secret places for non-perishable food.

A Hidden Room

Like me, maybe you know your way around a project at home. If the space is completely shielded, home invaders will never be able to locate a cache, and most homes do not come with secret rooms upon purchase (unless you’re lucky).

Tons of homes have “dead space” between the walls, leaving a few rows of vacant square footage here and there. It is possible to excavate, reframe, and add shelves to these rooms. A bookshelf or cabinet will mask the entry to your new secret food storage to conceal the space entirely.

Emergency Shelter

You may already have an underground storm shelter if you are living in a tornado area. In these areas, surplus food can easily be stored. Since they are underground, the humidity levels for food storage should be sufficient.

It should be stored under benches or on shelves. It is also a smart idea in your climate to have sustenance during increasingly dangerous conditions.


Under Stairwells

There’s always a lot of empty space beneath your basement’s stairwell, or from the first floor to the second floor.

This is a great opportunity to store food, as this room is normally dry and regulated by temperature. At the very back of the stairwell, I like to store food and store household furniture and other stuff to hide the food behind it.

Survival Caches

You can dig some proper storage caches all over your property in the case of SHTF. Moisture, critters, elements, and temperature are immune to all cache containers. Remembering where you buried them is the hardest part!

Closets

Sure, it might be obvious to store food in a closet. But it’s the place you need to pay attention to inside the closet.

In your coat closet, boxes of non-perishables can be kept under hanging coats. On top of most closets, the high shelves often go unused, making them the ideal place to store lighter items, such as lighter bags or vacuum-sealed foods.


Rental Storage Unit

Just in case your home is destroyed or stolen, you can never store all of your food in one location at home. If your house is under pressure, getting some food surplus in a storage unit is a smart idea.

Rentals that are temperature regulated and reputable can be found. Some are even elevated in the off-chance the unit has a critter or two. The unit should also be well-shaded and facing away from direct sunlight.

Bug Out Location

If you are lucky enough to have a place to which your family retreats in a global emergency, make sure that you have a non-perishable rotation hidden in that location. This way, packing food is one less thing on their mind if family members have to run.

It is helpful to share this room with trusted family members and friends if anyone is in trouble. Both participants can consent to continue to add to the stock as they take it.

Galvanized Steel Garbage Cans

These garbage cans store some items very well, such as dried beans or grains. They can be stored in a garage, basement, or barn and will retain optimum temperature and moisture. This is also a perfect place to store extra pet food if you are a pet owner. Using brand new bins, with food containing oxygen absorbers in mylar packets.


In The Ground
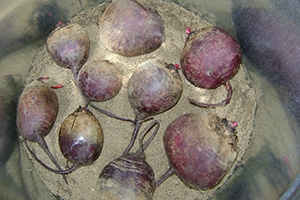
How do you store food in a garden of your own? In cold weather regions, root vegetables can be stored immediately in the soil after harvest during the winter months.

Vegetables that can be stored in this way range from beets, to potatoes, to carrots. To ensure the veggies are free from rot or critters, check regularly.

Chamber

A perfect place to hide food is the guest bedroom/home office. N on-perishables can go inside a desk or be stacked inside the closet. Without being in plain sight, storage shelves may also conceal additional food.

Some Places You Should NEVER Store Food Are:

  • The attic – hot temperatures fluctuate during the summer, spoiling all of your food.
  • A crawl space – critters can easily penetrate these and crawl spaces typically get warm in the summer.
  • The shed or barn – again, temperature and rodent control is too difficult here.
  • Near chemicals or excess fuel. Just don’t do it.

In the event of an emergency, we all have excess food storage to support ourselves, so having some secret food somewhere will ensure that you have enough in a crisis.

It’s never fun to think about what if it was, like what if I was robbed? What if my stock of food is compromised? If that is the case, it will secure our safety by being prepared on all fronts.

For when SHTF, we all have our food storage. Without outside interference, some of us can survive on our supply for years. What happens, though, when our supply is threatened

Nature is giving us everything that we need. The problem is that most people have long ago lost the requisite skills and information to make use of all that nature offers. The insane part of it is, nature gives us an incredible abundance of food even in the middle of town. I think we all know of an oak tree somewhere in or around our neighborhood.

Acorns are a gem in the world of natural food, a diamond concealed in plain sight. In part, they make a perfect food for survival because they are so easy to find and harvest. Plus, acorns can be used in so many ways, including as a substitute for coffee and in a wide range of cooked dishes. These do provide a good nutritional level with nutrients including healthy fats, tons of protein, carbohydrates, some calcium and iron, and tons of magnesium, potassium, and vitamin B-6. However, you need to learn how to harvest and store these nuggets of protein in order to be able to use them.

Harvesting Acorns

Acorns

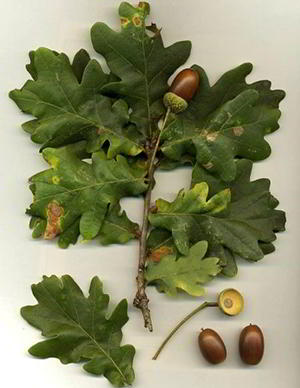
It’s pretty quick to pick acorns-you just wait for them to fall off the tree. You must first be sure that you know which trees are oak trees and what an acorn looks like. Typical oak leaves and acorns are seen in the picture shown here.

When considering the harvesting of acorns, it is best to know which varieties of oak trees are in your area. Taking the time to identify the oak trees around you in the spring by looking at their leaves and referring to a tree book. When looking at their leaves, oak trees are much easier to recognize than by looking at their Acorns.

Here are the types of oak trees and the type of acorns they produce:

  • Emory Oak: Produces mild acorns that don’t need processing.
  • White Oak: These produce blander acorns that are good for harvesting. The best white oak trees form which to harvest include the burr oak, the Swamp Oak, and the Oregon White Oak.
  • Red Oak: These acorns are more bitter and will require more processing.
  • Black Oak: These are the most bitter acorns and will need to be leached a lot to get rid of the bitter taste.

Types of Acorns

Emory Oak                White Oak                 Red Oak                     Black Oak

Of course, from any of those trees you can harvest and eat acorns. It’s just that the bitterer the acorns are, the more they will need processing. The bitterness is attributed to a substance called tannins in the nuts. The more acorns have tannin, the more bitter they are. Plus, the tannins can cause an upset stomach, but these tannins can be removed, which we will speak about below.

If you’re searching for acorns to harvest; the best time to harvest is late in September and into October (climate can vary), but you can recover them through spring. The best thing to do is make sure that the day is dry and that’s early in the season. Go and just pick the acorns up from the table.

When selecting acorns, it is important to select nuts that do not have any visible holes in them. Weevils are particularly fond of acorns, so any sign they have bored through the nutshell indicates that the nut is no good. It is the weevil larvae that are the main concern, and only the nuts from which they emerged can be described. That’s right, it emerged I said. The weevil larvae come out from the inside of the nut, so you could get home from your harvest to find other weevil larvae infested nuts.

Shelling

When you get your acorns home, put them all in a large bowl of water is a good idea. This will enable you to detach the good from the bad. If t hey are good, they are going to sink. If it’s bad, they’re going to float. Once you have done that, you’ll want to dry them completely before shelling them. You can do so by setting them down for 15 minutes in a 150 degree oven. You can do that too by putting them in the sun for a couple of days. Drying them out will make it possible for the nut inside the shell to shrink slightly, making it easier to seal.

It is relatively easy to shell the acorns. If they’re still green, you can get into them with a knife. Otherwise, simply remove the cap (if not removed already), put the nut flat-side down, and strike the pointing end with a hammer. If the nut is longer and will not be at its end, only touch the nut ‘s side. Sometimes, it is best to put your acorns in water as soon as they are shelled, at least to make the acorn flour more aesthetically pleasing. The nuts will oxidize really quickly and if they do, the color of your flour won’t be as bright. The oxidation process is prevented by water.

When it comes to Red Oak acorns, the nut inside the shell has a skin on it which is very hard to extract. For this reason, boil the red acorns before shelling them and shell them while they’re still dry. When you do this, the skin and the shell will come off.

Removing the Tannins

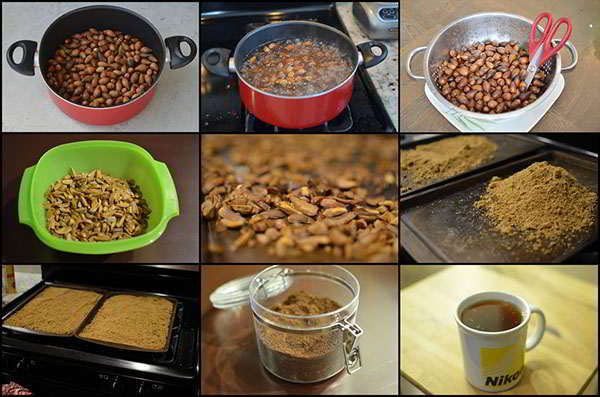
OK, we’ve spoken about acorn bitterness and the need to eliminate the tannins that trigger it. Fortunately, that’s not hard to do. First, let’s think about the way the tannins are extracted quicker. You need to put the shelled nuts in water for this, and bring the water to a boil. When the water starts boiling, pour it away, add fresh water, and repeat. Repeat this as many times as needed to make the water run clearer (it starts dark) and the nuts go sweeter to taste.

But here’s the stuff. When you boil the acorns, you remove a starch present in the acorns that works in wheat flour much like gluten, allowing the acorn flour to bind to itself. You don’t need heat to dissolve the tannins, however, water can do that alone. The thing is, it will take days without the heat, rather than hours.

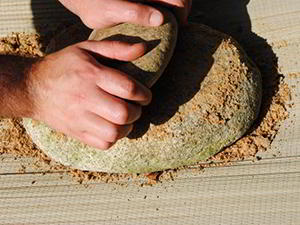
grinding acorns

To remove the tannins from the acorns, particularly if you are going to grind them and use them as flour, you must grind them into flour and mix them in a ratio of 1:3 with the water. Put the mixture into a glass jar and hold in the refrigerator. You have to shake the container every day, and then dump out the water 12 hours later, replacing it with fresh water. Deleting the tannins with this process will take 1 to 2 weeks.

Drying

You’ll need to dry your acorns or the flour you’ve made until you’ve drained the tannins. The best approach is to spread them and set them out in the sun on a baking sheet. If this is not an option, you can use a dehydrator that will not destroy any of the nutrients, or you can use the lowest setting of the oven. If the acorns or the acorn flour are dried, you need to store it in the refrigerator. Alternatively, you can freeze it, but it must be kept cold, as it will easily rancid.

Food You Can Make

Acorns have such a wide variety of uses that they are curiously not part of our daily dietary choices. You should roast acorns first and foremost, and eat them that way. They are yummy!

These roasted acorns can also be grinded into a meal, and used as a great coffee substitute. If you don’t want to totally replace your coffee, you can still add a nutty flavor to your daily coffee with the roasted acorn meal.

accorn survival food coffee

As discussed above, acorns can be ground into flour that is great when baking. You can use it to bake the following:

  • Bread
  • Cookies
  • Corn cakes
  • Acorn porridge
  • Pancakes
  • Burgers

Used whole or in pieces, acorns can be used to make:

  • Acorn brittle (as a substitute for peanuts)
  • As a substitute for any nut in any recipe
  • As a substitute for beans and legumes in soups and casseroles
  • Sprinkled on the top of salads or mashed potatoes

Finally, you can grind acorns into a rich and yummy nut butter as with any other nut. Really, acorns, either whole or ground, can be applied in many ways. They make one of the best, easiest to find, and most nutritious foods for survival, but they are so plentiful and easy to process that you don’t have to wait until the end of the world as we know it to harvest and use those little beauties. They are available anytime and ready to take!

Nature is giving us everything that we need. The problem is that most people have long ago lost the requisite skills and information to make use of all that nature