Home2021February

Humanity has survived in some pretty frigid extremes, even before the advent of our sleek ski suits and long underwear. Even so, it doesn’t take all that much cold to start affecting our moods, physical capabilities, and eventually making us sick or endangering our lives. Whether bedding down in a sturdy home, on the move, or making a temporary camp for the snowy season, there are a lot of lessons we can take from history to keep us safer and more comfortable.

Tipi & Longhouse Fires

From the Vikings who dealt with some pretty gnarly conditions to the Native Americans on the East Coast, longhouses have been common throughout history. The general types share a few common traits. There’s a fire pit in the center, or several dotted in between, with sleeping or seating areas down the sides. The construction differs somewhat, with Vikings going for very solid, deep, permanent longhouses and only turning to higher floors and loftier ceilings later in history.


The First Nations and Native tribes who built winter longhouses typically built them with higher ceilings, which served the dual purpose of increasing space for storage and drying winter fish and game as well as allowing smoke to rise higher and out of faces. The higher ceilings also allowed them to vent smoke without as many drafts making it the floor.

The migratory Indians of the plains also turned to height to allow smoke to rise – yes, the large tipis of the Sioux and Lakota had fires inside them.

Tipis of original construction were seriously tall, and built with flaps that could be opened and closed near the tops. Natives could control openings to allow for ventilation but minimize drafts reaching the ground level. It took only a small fire to warm the conical space, with the shape helping to minimize rising heat loss. The shape also helped with resilience to the harsh winds of the Great Plains, and to shed snow and icy build-up when in winter camps.

We might not be able to build permanent homes to take advantage of every aspect of history, but we can apply some of the same facets, especially remembering that we need ventilation space – but it doesn’t have to be empty, wasted space. We will likely construct smaller shelters on the move, especially if we’re by ourselves, but the benefits of lessened heat loss, small space to warm, and buffering and withstanding winds and heavy snow or ice can make both a tipi shaped shelter or a geodome shape a good one to be familiar with.


Switch Sheets

Those Vikings and natives in their longhouses had another trick up their sleeve, just like everyone else in cold climates, ancient Samurai to modern Mongols: furs. When winter chilled bones, bedding was switched out so folks piled into thick, dense furs.

We might not be big into furs now, but we can still apply that. One, it was dense furs below as well as above. Throwing a comforter or blanket down over a mattress or the bottom sheet can be a fine way to buy a few degrees of warmth in winter. Likewise, instead of a sheet near the body, even a flannel sheet, the next time toes are cold, think about remaking the bed with a fuzzy flannel or fleece blanket between you and the quilt or comforter instead. Sheets are far easier and faster to wash and dry, but when it’s a difference of trying to sleep through tensed muscles or huddled together instead of stretching out and relaxing in comfort, it just might be worth it.

Backpacking in cool weather, I regularly carried a lightweight but fuzzy flannel blanket to line my bags with instead of my usual sheet. Even though my bags would have done the job, most likely and almost anywhere, the blanket also had a warm-and-fuzzy morale boost.

Caves & Construction

If we do have a chance to build from scratch, we might take note of the number of ancient and more modern folks who have survived winters by bunking down into caves. Deep places in the earth hold a more constant temperature. It may not be warm – an advantage in summer – but insulation can definitely be an aid over the lightweight and thin stick construction of today or single-layer bricks.


Erecting wraparound porches with or without screens, pulling drywall to pack in insulation, planting evergreen shrubs, or attaching greenhouses can all be ways to increase the “thickness” of our construction and help regulate the temperature inside our home.

Tapestries

Stone is not without its faults, even thick stone. Tapestries were originally conceived in the Middle Ages for a far different purpose than movable art. Originally, they weren’t ornate at all. In some cases they were plain straw mats or even animal skins. Humble or elaborate, they helped buffer residents from the cold and damp that seeped around stone and earthen walls.

We don’t have to have stone to benefit from the same. If we’re in a serious disaster, buffering our walls with blankets, quilts and comforters can provide us with the same insulated benefits. Especially if we have modern construction of planks, OSB, siding, and drywall, we might be served very well to invest in tarps and nails to line walls, and hunt up free and low-cost bedding and tablecloths at thrift stores, yard sales, and freebie websites.

Rushes for Floors

Another form of insulating used in early times on both sides of the Atlantic were rushes or straw laid across floors. Historians may have gotten it wrong though, and beyond the very earliest days, those rushes may have been woven into mats instead of strewn loose.

If you bring a bunch of dry grass into my house, I may have to hurt you. However, we can gain the same benefits layering carpets and rugs and runners.

I lived in an old farmhouse with such cold floorboards, my mother actually used to throw a quilt under a rug at the dining room table, and cover the living room floor in a comforter to get the dog beds and feet a little higher off the floor. She used another comforter or several sets of rugs under our beds, giving them just a few degrees of insulation from the cold boards – a few degrees that made a big difference.

It doesn’t have to cost a fortune – we grew up pretty poor. She made the comforters herself out of thick padding and a couple of durable pieces of fabric, sometimes old curtains from hotels, and picked up carpeting from installation companies to clean, cut to size, edge and use as rugs. Like our ancestors before us, she saved clothing and scraps, and turned them into patchwork quilts – some lovely and intricate, but most just simple squares patched together.

Canopy Beds

In the olden days, the lucky and wealthy had canopy beds that helped tremendously in cold winter nights. It’s like an igloo or tipi: The curtains and the top create a smaller space to warm up, and it’s easier to keep warm. They also cut warmth-stealing drafts from the room, and help keep heat from rising all the way to the ceiling.

We can replicate aspects of the canopy bed in a lot of ways. My father really did once pitch tents atop beds during a long, severe blizzard. For a short-term disaster, we might have low enough beds and tall enough chairs to create a small space similar to a snow cave.

For a larger personal or widespread disaster, we can prepare with four, eight, or twelve poles from unwanted bamboo stands or swing sets, or pick up some lumber. Shower rods and curtain rods, more bamboo from a roadside, and tarps, freebie curtains, layers of free or cheap sheets, and we’re in business.

Stoves vs. Fireplaces

Benjamin Franklin revolutionized more than we may know. He’s responsible for the switch from fireplaces to home-heating cast iron stoves. Fireplaces tend to be drafty and require larger chimneys – chimneys not conducive to moving or taking apart for cleaning. The cast iron stove eliminates some of the cold air drafts drawn in by the fire and chimney. It also creates a huge heat sink that more effectively radiates warmth into and throughout a room.

We can replicate some of the advantages with metal grating in front of fireplaces, and fire bricks and stone that will hold and radiate heat. We can add metal pots of water in front of a fire or on a stove to increase heat retention and radiation. We can also add actual radiators to our chimneys, increasing the warmed surface areas that can in turn help warm and heat our homes.

Hoods & Caps

There are all kinds of funny hats in history, and they worked. The folks who wore – and wear – knit caps that come over the ears and big square bonnet-like hoods stayed warmer, in bed and out in the chilly world. If we anticipate a long-term or personal disaster in winter, some sleep caps and fur-lined or wool-lined hoods we can wear with anything are a very good idea.

Chamber Pots

While the wealthy eventually used them exclusively, the poorest and earliest users turned to chamber pots overnight to eliminate the need to expose themselves to the most severe cold hours, or the hassle of getting geared up to hit an outhouse or latrine. Honeypots are still a winter staple for some First Nations and Alaskan camps, where plumbing and outhouses freeze solid. In addition to the usefulness in winter, something to stand in for chamber pots (or bedpans) are worth the investment in case of illnesses.

Furry Friends

It’s not really a joke. Body heat is a wonderful thing, and nothing pumps it off like a cat. History and the modern world are full of anecdotes about cats and dogs being lap warmers, and being allowed in to share beds – especially with children in the pre-HVAC eras. Children were also packed into beds in winter to share warmth, both to be able to layer more blankets in a single space and because of the shared body heat. Explorers and hikers have spooned to survive in countless situations.

Modern Tricks for Staying Warm

Windshield reflectors (or Mylar blankets) – Place them under beds, sheets, or bedrolls, or behind you and behind a campfire to reflect heat back towards the body.

Create a smaller space – Divide rooms with curtains or panels, or hang curtains to close off entryways and large openings where there are no doors. It creates a smaller space to warm. Remember that heat rises, so as with a proper canopy bed, closing off the top is important.


Switch Curtains – While we’re collecting goodies for hanging, we can also collect darker, heavier fabrics to switch for the lightweight, pale summer curtains in our windows. They’ll help absorb and hold heat during the dull gray days.

Flip Fans – Ceiling fans help in summer by drawing heat up and creating a breeze. In winter, changing the rotation or in some cases flipping the blades can help push rising heat back down. It can save a few degrees on the thermostat, and the electricity or wood for heating the house or room those few degrees.

Stay Dry – Forget “wool is warmer when wet”. “Warmer” is a relative term. Wet wool will give you hypothermia, blisters, and chilled footsies just the same as leather, cotton, linen or hemp. It might buy you minutes or a few degrees, and that can matter, but don’t rely on it. If you get wet or sweaty, change; plain and simple. Avoid getting wet by investing in trash bags, overboots/Mickey boots, Mucs or Bogs or similar field boots, gaiters, ponchos and rain pants.

Snug As A Bug

History is full of lessons we can apply at home and afield, now and later, whether we’re trying to cut heating costs (or labor) or trying to survive and thrive in a disaster. Most require at least a little planning and forethought, although many can be accomplished with free and low-cost salvage.

The older we are and the more we abuse our bodies, especially, the more we will feel the pains and discomfort of cold weather. It can wind up costing us our edge from poor sleep, or affect our ability to complete even simple indoor tasks from cramped fingers.

Remember, it doesn’t have to be sub-zero to be uncomfortable, or for hypothermia to take effect. Start with the body and warm the smallest area necessary in a survival or disaster situation. With a little preparation, we can take advantage of all our forbearers’ experience to stay roasty-toasty, this winter and regardless of what the future brings.


Other self-sufficiency and preparedness solutions recommended for you:

The vital self-sufficiency lessons our great grand-fathers left us

Knowledge to survive any medical crisis situation

Liberal’s hidden agenda: more than just your guns

Build yourself the only unlimited water source you’ll ever need

4 Important Forgotten Skills used by our Ancestors that can help you in any crisis

Secure your privacy in just 10 simple steps

Humanity has survived in some pretty frigid extremes, even before the advent of our sleek ski suits and long underwear. Even so, it doesn’t take all that much cold to

For preppers, a home’s location is of utmost importance. Your home is your headquarters, your castle and sanctuary. It’s the one place you hope to feel in control when chaos breaks out.

Serious preppers are beginning to invest in purpose-built retreats that are off the grid and away from the fray. But make no mistakes about it. These retreats aren’t about relaxation and taking in a scenic view. The sole intent is to have a place that is made to stand on its own if humanity were to falter. In this article we will highlight 7 factors to consider if you are looking for the best property for preppers.

Determining Access to your property

Professional movers like North American have helped thousands of people move to urban areas and remote locations. One important piece of advice they give to preppers looking for a remote retreat is to always consider access. How will you and others access your retreat location?

gate-solid-wood

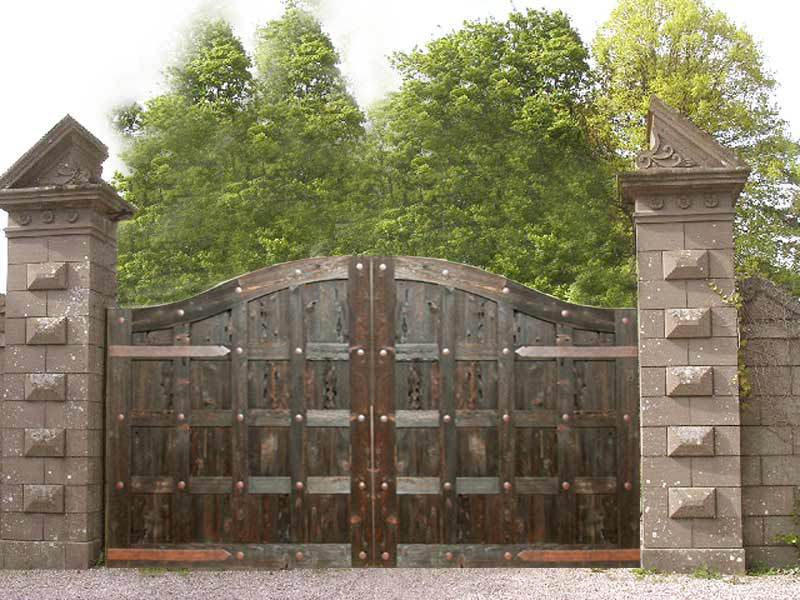
Thinking about how you will control access to your retreat property is an important consideration.

For most people, it’s fairly easy to get vehicles and moving trucks to a new home. Preppers that live in non-traditional areas like a hillside may need to work out additional logistics to get a home setup or built. This can actually be a benefit since it will also be difficult for others to get on the property. However, be prepared to construct your own roads if you’re looking for raw land to build on. This could have major consequences on price.

If a property is heavily wooded there could be hidden access points. It’s important to walk the entire perimeter of the property looking for entry points and notating where fencing or barbwire will be needed to block access.

Must have sustainable Water Supply

water

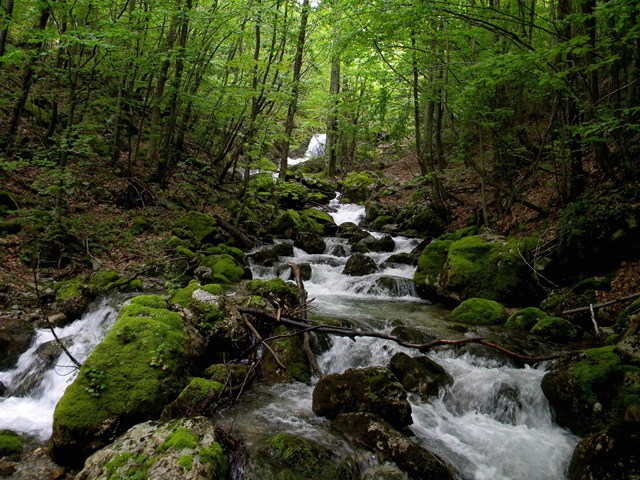
A sustainable and abundant source of water is a must.

Having a ready supply of clean water is the biggest priority during natural disasters, riots, war and every other emergency situation. Preppers understand that they need to have a long-term solution that goes beyond storing gallons of bottled water.

It may be difficult to find a piece of property along a stream, river or lake that isn’t already in a developed area. Flooding is also a concern in these locations. The better option is to have a well. Currently, about 15% of Americans have private water sources. However, you will want to check the local health department for information on water regulations and testing guidelines in the immediate area.

What are the Security Issues of your property?

Securing your property is necessary for protecting your people and supplies. Many preppers look for property that’s already fenced off with access controlled by a security gate. If the property has no perimeter barrier that will need to be factored in before deciding on an asking price. It’s also important to bear in mind that vegetation is no substitute for fencing. It can slow people and animals down, but it won’t keep them out.

Do you have adequate Storage for your supplies

storage

Tiny Homes are catching on, but they don’t have anywhere near the amount of storage you would need for your prepper property.

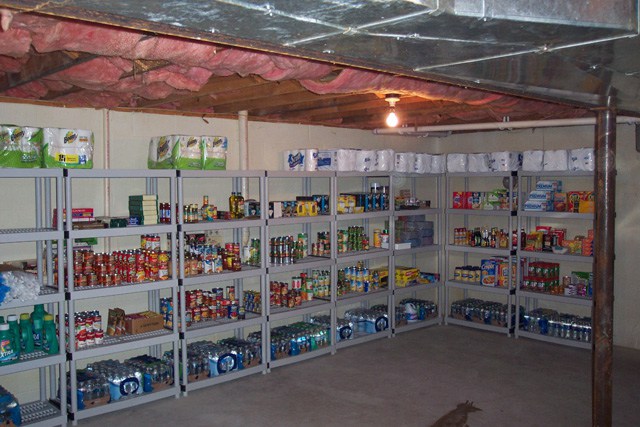
From food containers to firearms, preppers know the importance of stocking up on supplies. The problem is you need a place to store everything so your supplies aren’t compromised. Many prepper real estate consultants suggest that people consider properties with at least five acres in order to have enough space of living, farming and storage.

How you store food could have serious implications on survival, strength, health and morale. Properties that already have a storage shed or barn that can be secured will put you ahead of the curve. Dark, underground cellars offer good storage for canned goods, but you may need a climate-controlled space with low moisture levels for wheat, grains, legumes and fresh produce storage.

What is your Off the Grid Power Supply?

solarpanels

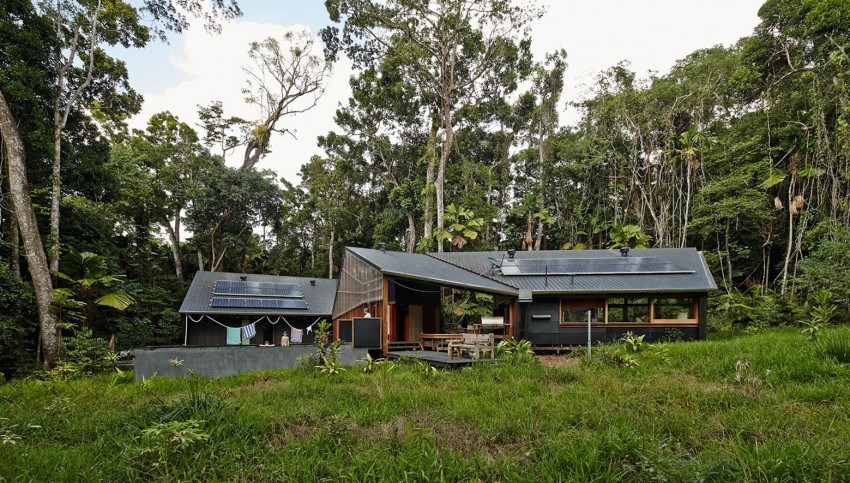
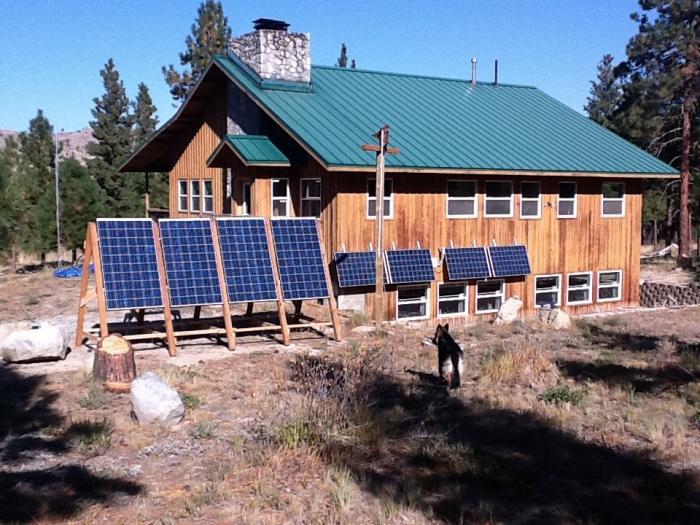
Mounting Solar panels on roofs or moveable frames allow for easy access for maintenance.

During a worst case scenario, the power grid will likely go down. People that have prepared in advance by putting together an independent power supply will have all of the modern day conveniences, including security systems and device chargers.

Homes that have already been outfitted with solar panels, wind turbines, thermal heating and gas-powered generators are essentially move-in ready. If power supplies aren’t in place you’ll have to assess the area to gauge its wind and solar power potential. Ideally, you’ll want a variety of power sources and ample power storage for times when the wind and sun aren’t in abundance.

Soil Conditions for crops

goodsoil

The soil quality will be a major factor in your ability to raise your own food.

Like water, food is a necessity for sustaining life. You can go much longer without food (at least three weeks), but the fact remains that your rations won’t last forever. Eventually, your stock of food supplies will be depleted, and you’ll have to rely solely off the land.

Many people overlook the health of the soil on a property even though finding a spot that can support crop growth and has good drainage is critical. If the property already has fruit trees or a garden that’s a very good sign. Remember, your store bought food supply will only last so long. You have to stock up on seeds and consider how your land can produce sustenance.

Bonus – Underground Bunker

The ultimate property feature for preppers is an underground bunker. In the event there is a nuclear bombing or biological warfare a bunker is a last resort for surviving the fallout. Bunkers can be standalone structures or connected into the power grid. When connecting electrical and plumbing sources it’s important to ensure all the spaces around conduits and PVC pipes are thoroughly sealed with silicon caulking.

For preppers, a home’s location is of utmost importance. Your home is your headquarters, your castle and sanctuary. It’s the one place you hope to feel in control when chaos

One excuse that some people use for not beginning to prepare for disasters is the cost. They look at shows like Doomsday Preppers or view the advertisements on prepping or survival blogs and start mentally calculating the costs of everything they need in their head. When you look at Prepping or being prepared as a destination it is easy to see why this thought looms in the minds of people everywhere.

It doesn’t have to be that way.

I have said it many times before that Prepping is a lifestyle. Prepping is never something you can finish and for most of us we will never be as prepared as we like, but by taking slow, steady steps towards your goals you will be more prepared today than you were the last month. When you look back years from now you might be amazed at what you were able to accomplish.

Now after saying all of that, I will readily admit that prepping in many areas involves some financial commitment. The trick is to acquire prepping supplies as your financial resources allow, don’t break the bank, but save money at every opportunity. Today I wanted to share a couple of ideas I have used personally to save money. When you are prepping on a budget, you want to put a good bit more thought and research into purchases but this should save you some money in the long run.

Determine what you need to spend more money on

A highly rated, fixed blade survival knife for $25?

There are some items that basically do the same thing, but depending on who makes the item, the cost could be dramatically different. You could purchase an Audi or you could purchase a Ford. They will both do the job of getting you where you want to go in relative comfort, safety and dependability, but one car could be twice as much as another. Yes, the Audi might have different amenities, aesthetics and niceties. It is probably engineered better and will overall be a better investment, but you chose to spend more for one.

It is similar in some respects to many of the items we look at as necessary for prepping. We know we need a certain item and begin shopping, reading reviews or scouring the comments on prepping blogs for the perfect item. Many times this will lead you to an item that while very good, is not significantly better at doing the job you will require of it to warrant spending twice as much. Knives are perfect examples of this concept and firearms usually get into this territory as well.

Before anyone gets on to me, I firmly believe in the concept of you get what you pay for. I don’t advocate buying the cheapest thing you can find in all circumstances but sometimes, you just don’t need to buy the Audi when the Ford will be perfectly fine. Consumables are where I first looking at cutting cost. Disposable paper products, lighters, matches and toilet paper are easy targets. Dollar stores are great for some items but not everything. Yard sales are excellent bargains too if you have the discipline and can find the right deals. I have a friend who has some special power for finding ridiculous deals like a crossbow in a case with arrows for $50. About all I can find is books.

Something like a knife involves a little more research, but you can easily compare products on sites like Amazon.com. Should you spend $155 for a Cold Steel Espada with polished G10 handle knife or would something closer to the $24 Gerber Warrant Knife do just as well for saving your butt in a survival scenario? I know there is a case to be made for spending money on collectables or what you “must have” because it makes your soul smile, but we are talking about saving money here.

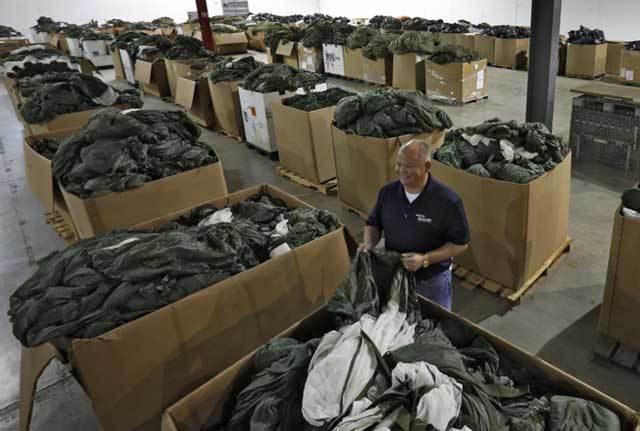
Military Surplus stores can be a good source of deals on some of your prepping supplies.

Purchase used items

Another good way to count pennies if you are prepping on a budget is to buy gently used items. Not every piece of prepping gear you get needs to be brand new for it to be perfectly suited to what you need and this almost always will cost you less than full price. One place to get some items used would be Ebay, military surplus stores and Craigslist. I wouldn’t get underwear or anything like that, but I have purchased used military sleeping bag systems and saved hundreds of dollars. You can shop for backpacks and other camping gear in the off-season (right now) that people are looking to get rid of because they got new equipment for Christmas.

Firearms are usually just as good when they are used as brand new, but you likely won’t save too much money going this route because firearms don’t typically lose their value. You could save$50 to $100 though if you shop around. Pawn shops and gun shows are two great places to legally purchase used firearms and save some money.

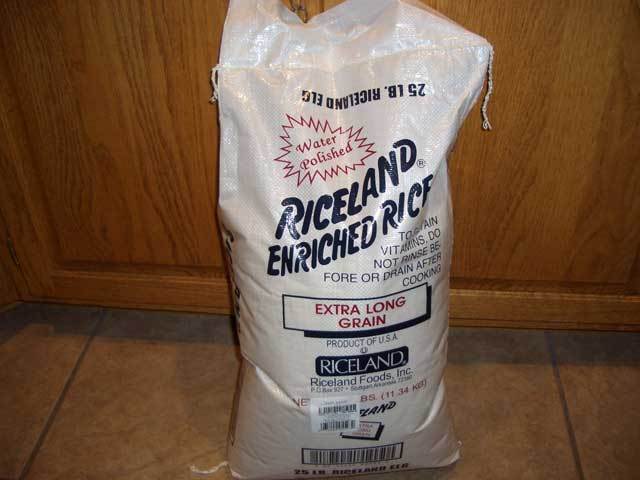
Buying rice in bulk is a huge cost savings.

Buy in bulk

Food is one of the first things that preppers stock up on and it makes sense because we all need food, pretty much every day but you can save money by purchasing in bulk. There are a few good candidates for this method, but Rice, Beans and Whole Wheat come to mind. Instead of buying the small bags of rice, you can buy a 50 pound bag of rice for about $20. This one bag provides 504 servings of rice. To keep it fresh, you can store it in sealed Mylar bags. You can also bulk purchase Salt, #10 cans of fruit and veggies and toilet paper if you have a Sam’s or Costco membership.

Another thing to buy in bulk is ammo because you can usually get a better rate if you purchase 1000 or 500 rounds at a time as opposed to a single box of 50. Freeze dried food in bulk supplies of 3 or 6 months will save you money and cut down on the number of trips the UPS man has to make to your door. Yes, these purchases cost more out of pocket, but it could actually save you money to wait until you have the funds for that bulk purchase. Naturally this assumes you have some supply at your disposal while you are saving.

Don’t buy during a panic

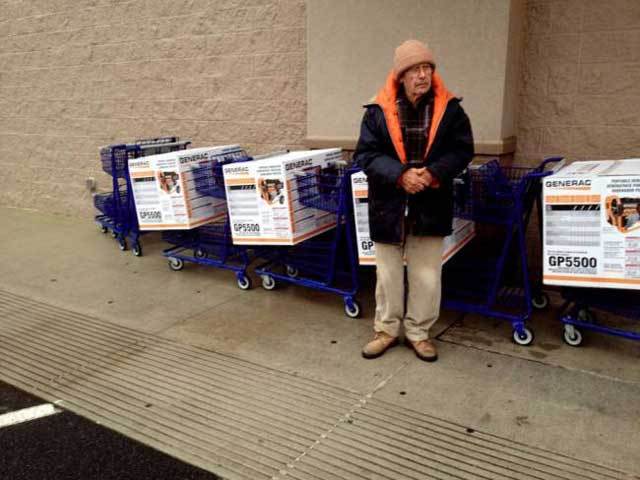
Do you know when the absolute worst time to buy a generator is? Immediately after a disaster. I have heard stories of the cost of generators doubling after a flood, tornado or other crisis and that is simply because the demand goes through the roof. Resist the urge to buy anything prepping related like this in the aftermath of a disaster unless it is absolutely necessary.

A good strategy is to wait until everyone who bought these generators are selling them 6 months down the road because they don’t believe they will ever need them again. Along with items like generators, food supplies are lower during a disaster as well. You don’t want to be running to the store when everyone else is.

One good thing you can do is to create a list of all the prepping supplies you think you need and prioritize the items in that list. Once you have them in priority order, you can be more selective about what you purchase and when. Take some time to shop around. The internet is a great tool for comparison shopping and you can easily see who has the lowest prices on items. With a little forethought you can strategically make purchases and save money.

What ideas do you have for prepping on a budget?

One excuse that some people use for not beginning to prepare for disasters is the cost. They look at shows like Doomsday Preppers or view the advertisements on prepping or

In this article, we are going to take a look at five knots that you should know how to tie at all times. Why learning how to tie a knot you’re maybe wondering. Because they can save your life and these five important knots are a good start. The more of these dependable survival knots you learn, the better off you’ll be under adverse conditions.

If you have to navigate difficult terrain while hauling supplies, some types of knots will help make it easier and safer. If you’re lost, the right knots for fishing and trapping game can keep you from starving.

There’s a reason firefighters and Coast Guard rescue crews learn how to tie survival knots. In a life or death situation, a secure rope can save someone from a burning house or a raging storm.

So now that we know why we should know them, just find the details along with instructional videos below:

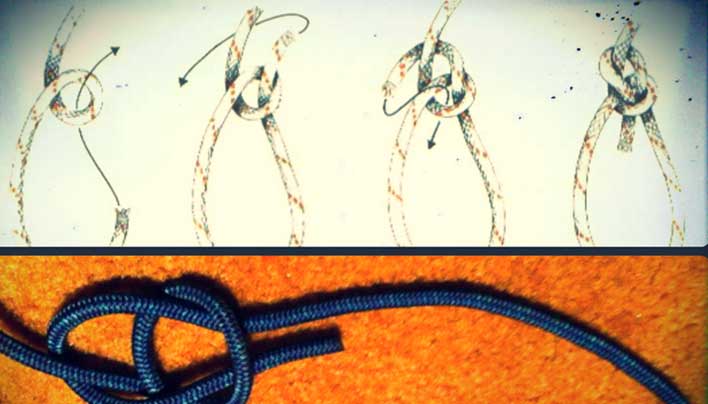
Bowline / One-Handed Bowline

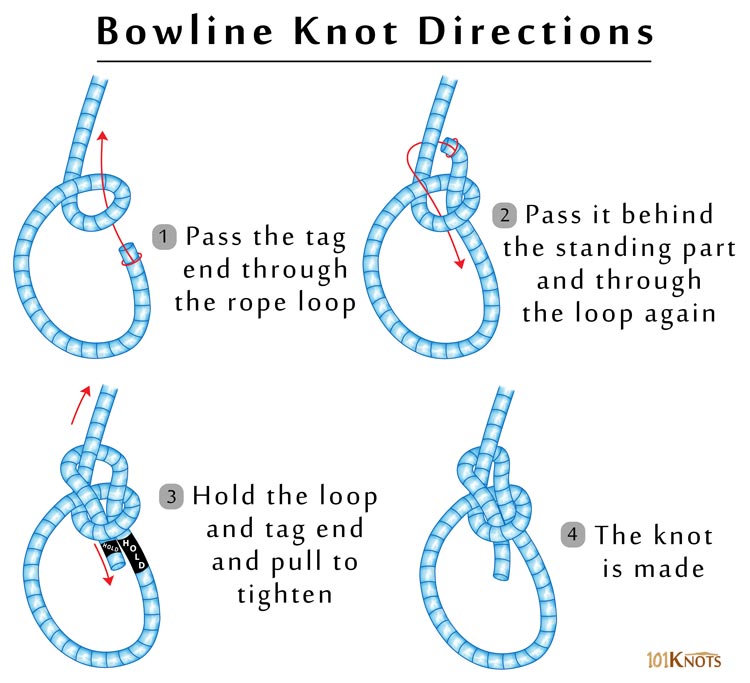
A Bowline is one of those knots that’s useful for many applications, putting a loop into a knot that won’t seize upon you, or more importantly a One-Handed Bowline that could save your life one of these days.

It seems like I’m always tying a bowline to secure a line to a fixed point. It’s a great all-around knot and one you should definitely know both on its own and one-handed.


Here you can see how to do a one-handed bowline:

Survival Uses:

You can tie the bowline around things or through them, and tie it around yourself. Being able to tie it with just one hand can be a boon when you need to tie a knot in an emergency. It’s also useful for hanging items from tree limbs, like food and survival gear.

Taut-Line Hitch

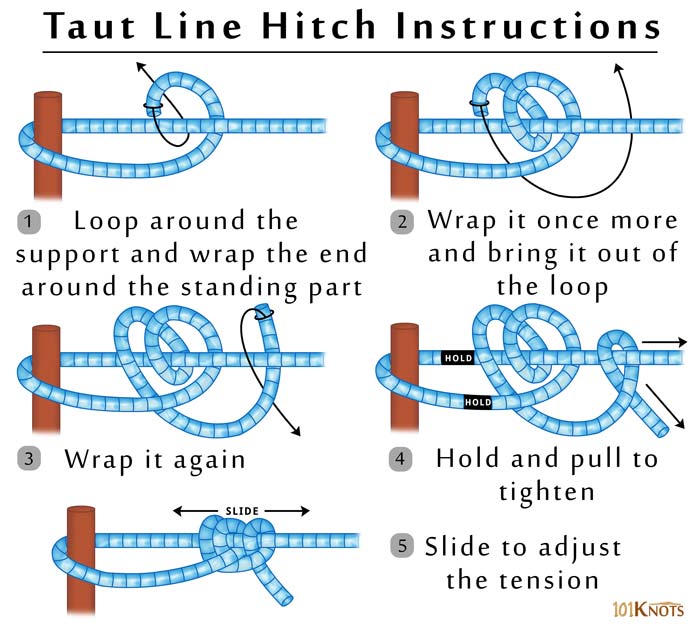
I feel like the Taut-Line Hitch is one of the most underrated knots out there, it’s extremely versatile and great for applications where you can have varying tension, such as securing a load. It’s most common application is providing adjustable tension for guy lines on a tent or tarp.
Some interesting sliders and devices now appear on tents’ guy lines to adjust the tension. Call me old fashioned, but I still prefer a Taut-Line Hitch.


Image credits: https://www.101knots.com/taut-line-hitch.html


Here’s also a video on how to do it.

Survival Uses:

A taut-line hitch is what you use when sheltering under a tarp. Stringing a rope between two trees and laying your tarp over it is the first step in creating a buffer between you and the elements. 

Threaded Figure-Eight

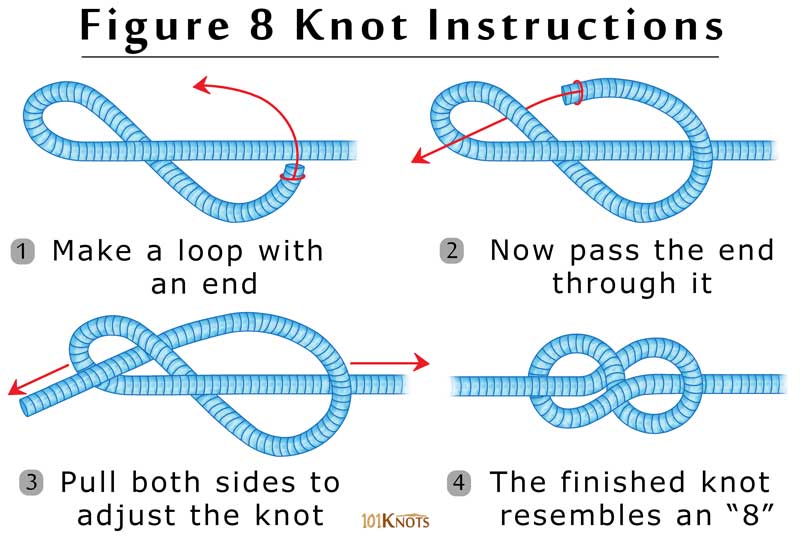
Another knot that’s underrated in its ability to get you out of a jam is the Threaded Figure 8.

Image credits: https://www.101knots.com/figure-8-knot.html

While the application I’m mentioning almost needs to be paired with a Swiss Seat at the least, nothing beats the Threaded Figure 8 to safely get you down from heights, whether on purpose or in an emergency situation.

The figure-eight knot creates a stopper wherever you need one on a rope, though the steps are also steps you take to create several other knots.

Here’s how you can do it:

Survival Uses: 
A figure-eight knot at the end of a rope can keep you from sliding off it. Is also one of the most useful types of knots for climbing. It’s an important survival knot for anchoring, especially when working in high winds or carrying gear up or down a steep incline.


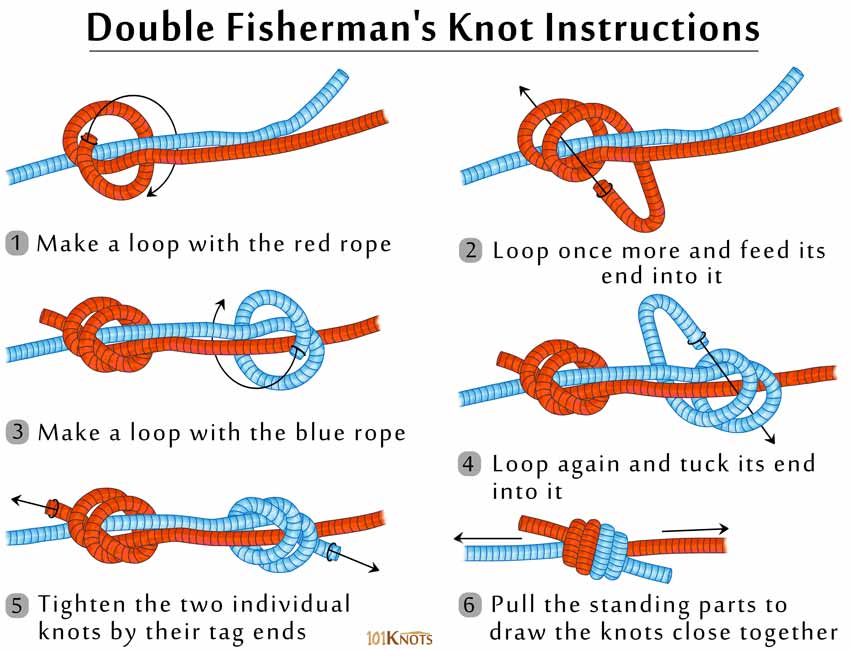
Double Fisherman’s Knot

Image credits: https://www.101knots.com/double-fishermans-knot.html

Image credits: https://www.101knots.com/double-fishermans-knot.html

For joining rope together or making an adjustable loop out of two of these knots, the Double Fisherman’s Knot can’t be beaten. Preferably the rope you’re joining together should be around the same diameter, as there’s better knots to join sections of different diameter rope such as a Beckett’s Bend or as it’s commonly known, a Sheet Bend.

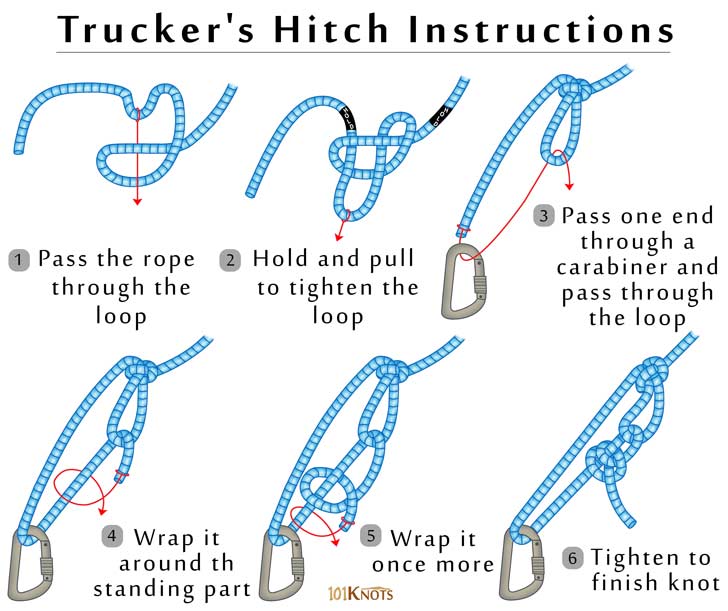
Power Cinch Knot

Another little known and underrated knot is the Power Cinch. Another great way to add tension to a line without the possibility of it slipping loose like I’ve seen Taut-Line Hitches do, yet very easy to pull down in a hurry.

Image credits: https://www.101knots.com/truckers-hitch.html

This is what I use for any kind of trunk line while I’m camping or putting up a shelter. Tensioning knots are something you should know and the reason I’ve included two of them in these five. I always see people over-tying objects in the back of a truck or in many situations where all they’re doing is trying to secure a load. Regular half hitches work fine, but that extra effort both in tying and removing all those knots simply isn’t necessary if you know the right knots to use in the first place.


Honorable Mention – Chain Sinnet

One last knot I’d like to mention is the Chain Sinnet, I literally tie this multiple times a week into all my extension cords and I can’t tell you how much time and aggravation it’s saved me over the years.

I was first taught this by an old employer who wanted their extension cords tied this way and I’ve always remembered it because of its efficiency. Mark this down as one to take a look at too if you’ve got the time for a bonus knot.

In this article, we are going to take a look at five knots that you should know how to tie at all times. Why learning how to tie a knot