Home2019September

In the case of a SHTF event, we could live without internet, cars and gadgets. We could survive without electricity, air conditioning, heating systems and hot water. But we couldn’t make it without enough food supplies. Canned tuna, frozen beans and boiled potatoes can only last so far. All these supplies are bound to end sooner or later, leaving us exposed to starvation. So how can preppers improve on this aspect and ensure their food supply doesn’t run out after three days? The answer is raising livestock. Our ancestors didn’t have supermarkets, had never heard about take-away, fast-food, processed food or preservatives. In this respect, we have a great deal of things to learn from them.

Related: Healthy Soil + Healthy Plants = Healthy You

Their survival depended on livestock, fruits, vegetables, plants and seeds. Nowadays you can learn about all of these by getting an agriculture degree. But back then, knowledge was passed down from generation to generation and people had to learn from trial and error rather than from a YouTube tutorial. If you want to make sure you are truly ready for anything read all about the livestock you should raise and why. It’s never too late to start researching livestock and becoming an expert in the field. Who knows, if you start right now, you might be taking the first step in keeping your family alive when disaster strikes.

Chickens

If we would have to advise you what livestock you should raise and why, based on rate of growth criteria, chicken would win by far. They manage to double their number with every year and they don’t require a complicated set up or high maintenance. They are great because they yield plentiful supplies of meat and eggs in relation to how much food they require. For example, a hen could supply you with 10 to 12 eggs for each five pounds of food.

Related: The Many Benefits of Raising Chickens

Another great benefit of raising chicken is that the birds are not picky about what they eat. They will happily peck on anything that they can find, from insects and weeds to leftovers from your dinner. The only drawback with this is that they can easily damage your garden, so you might want to fence them in to keep that from happening.

raisingchickens

Another pro for raising chicken is that they don’t need a lot of space or sturdy fences. However, you should keep in mind that these fowls will learn how to fly, so you might want to build a six-foot fence or add a top to their pen. You should also watch out for predators: foxes, owls, rats and opossums will all try to take a swing at your chicken if they’re not protected enough.

Pigs

Also dubbed the best garbage disposers, pigs will munch anything you put in front of them: kitchen leftovers, greens, roots and grains, just to name a few. In exchange for these, in return, they will give you bacon, ham and plenty of meat. Not only unpretentious eaters, pigs don’t need too much room either, despite their great size. The best time to buy a piglet is in the spring in order to give it time to grow and develop to more than 220 pounds over the summer.

pigs

All the maintenance pigs require is feeding and watering two times a day as well as cleaning their pens every few days. Butchering a hog that weighs over 200 pounds is no easy task. But you’ll only be reaping the benefits. Almost every part of the pig is edible and ready to be turned into steaks, broths, aspic, bacon, ribs, sausages, pork loins and trotters. Even the skin is edible, although most people are reticent to eat it because pigs are not among the cleanest animals. Bear in mind that they might test your olfactory tolerance before you manage to fatten them up and transform them into pork chops.

Rabbits

Not only pretty faces, rabbits are clean, quiet and prolific. Ideal for small spaces, rabbits will thrive in modest sized cages and as long as their manure is cleaned out regularly, they will remain odor-free. These furry animals are extremely rewarding for the amount of care and food they require. Rabbits feed on hay, which should be cut in three-inch lengths and stacked into the hay-racks that must be kept full at all times. They will also eat dried bread or crusts and, as it may be expected, they enjoy nibbling on carrots and roots.

rabbits

A buck and two does will yield as much as 50 rabbits per year, which translates into roughly 170 pounds of meat. Not too shabby for the effort you have to put in every day. Rabbits can be consumed as soon as they are seven or eight months old, but you can wait and make a more consistent stew from a three-year old buck. While they can withstand harsh cold weather, they are not big fans of wet or hot conditions. Keep in mind that they will need a cool place in the summer that has plenty of ventilation and fresh water supplies.

Sheep

Docile and quiet, sheep thrive on grassland, which is a huge selling point. They don’t require high maintenance and offer excellent products in return: meat, milk (which can be made into cheese), skin, wool and manure. Because they are amazing grazers, they are very economical. An acre of pasture can feed as much as four animals, without including the lambs. An adult ewe will be able to yield as much as 100 pounds of meat and 7 to 9 pounds of wool.

raisingsheetp

Care-taking is kept to a minimum, but you might want to prepare yourself for yearly shearing. Ewes might also need assistance in delivering their lambs and in making sure they are looked after. You should also keep an eye on the lambs which are extremely vulnerable in the first weeks and stand for an easy prey for natural predators. Easy to feed and look after, odourless and calm, sheep are definitely a top choice when it comes to livestock you should raise.


Other self-sufficiency and preparedness solutions recommended for you:

Healthy Soil + Healthy Plants = Healthy You

The vital self-sufficiency lessons our great grand-fathers left us

Knowledge to survive any medical crisis situation

Liberal’s hidden agenda: more than just your guns

Build yourself the only unlimited water source you’ll ever need

4 Important Forgotten Skills used by our Ancestors that can help you in any crisis

Secure your privacy in just 10 simple steps

In the case of a SHTF event, we could live without internet, cars and gadgets. We could survive without electricity, air conditioning, heating systems and hot water. But we couldn’t

A perennial problem faced by suburban and rural dwellers is obtaining water in the absence of utility provided electric power. Standby generators require fuel of some type, which will eventually run out, and deep drilled wells are poorly suited for use with hand pumps of most types.

As a prepper, this has always been a concern for me as I live in a rural setting, but in a house constructed with the modern “central-everything” design concepts. I do have a gasoline-powered generator, and maintain supplies enough for a few weeks of continuous running. After that, it’s carrying buckets to the stream.

This has led to my experimenting with some alternatives for my survival homestead, and based upon my current deployment I may just go off-grid for water completely. Most of the components I had lying around with the exception of the pump, and the batteries: those items set me back around $450.

Read more: The vital self-sufficiency lessons our great grand-fathers left us

The basics of my survival homestead:

  • Frame house with a huge, unfinished second story, currently just storage.
  • Drilled well: 270 finished depth, water table at approximately 50 feet down
  • Standard 220 VAC submerged pump at 100 feet depth
  • The usual captive air pressure tank with associated plumbing and pump pressure relay

So the conundrum is: how to extract perfectly clean water from this well at minimum cost, and without completely changing the plumbing. (I may want to sell and move further out, so any new owner will probably want things as standard as possible)

What I have come up with to date, experimental at this point is a solar/battery-powered pump that stores water in an elevated container, allowing gravity to supply the pressure. Keep in mind though: water is heavy! Be sure to reinforce your structure as needed! I’d consider this a relatively high level overview as opposed to a design doc, so tailor as needed for your own situation.

Stuff.

  • A 12/24 VDC submersible pump with 230 foot lift:
  • 100 feet of 1/2 “ pex tubing
  • Renogy 100 Watts 12 Volts Monocrystalline Solar Starter Kit (Amazon. Harbor Freight, etc)
  • 2 – 12VDC marine deep cycle batteries, connected in parallel
  • A second pitless adapter installed on the well casing
  • 2 – ½” Pex to brass adapter sized for the pitless adapter being used, (1/2 <> 1” in my case)
  • Pitless adapter top plug
  • A second strain relief for the well cap wiring pass through.
  • SharkBite check valve ½”
  • SharkBite Tee for ½” PEX
  • A used but good queen water-bed mattress (for experimenting only! Gets brittle when cold)
  • I will probably use plastic 55 gal drums for anything permanent.
  • 100 feet #8, 2 conductor, jacketed, direct burial stranded wire
  • 2 – reducing adapters – ½” pex > 1” brass
  • Zurn pressure reducer (had on hand – Zurn 1-NR3DU Wilkins 1-Inch Pressure Reducer Valve 15-75-75PSI)
  • 2 – SharkBite ½” gate valve
  • Limit switches (Amazon Model: a14061600ux0543)
  • Assorted connectors, plumbing bits, and crimpers

Read more: Build yourself the only unlimited water source you’ll ever need

Installing the new pump

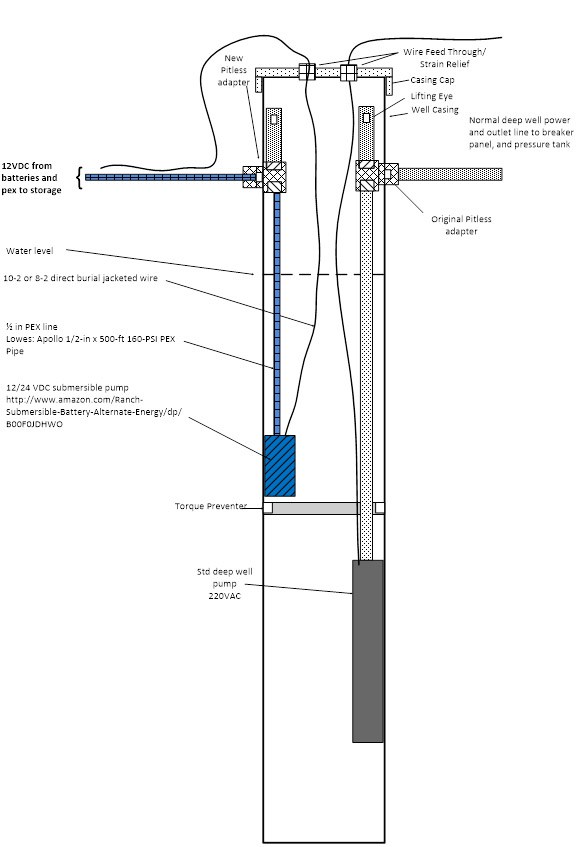
welldetails

Drawing 1 – Well details:

The first thing is to install the new pitless adapter in the well casing, just follow the instruction that came with it, In my case, I needed a 1-3/4” hole saw.

Using a string with a weight on it find the depth of the torque arrestor above the standard pump.

Using the same string with a float find the water level in the well casing.

Cut a piece of PEX approximately three feet shorter than the depth of the torque arrestor but be sure it’s still well below the water height. If it very close you may have to re-examine the well suitability.

Connect the two-conductor wire to the new pump following the instructions meticulously: you do NOT want the fitting to leak.

Connect the piece of pex to the new pump. Use stainless clamps or crimp collers.

Connect the PEX to the pitless adapter using suitable adapter hardware.

Run a piece of paracord through the lifting eye on the pump, either use twice the needed length so you can pull it free later or a bowline if you want to keep it in place.

Secure the line to something sturdy, it’s there in case the pump slips out of your hands.

Drop the pump and attached wire down the well. Be very sure it doesn’t come to rest on the torque arrestor! If it does, pull it and adjust the length of the PEX.

Install the solar array where ever you want: mine are on a south-facing roof with a 45 degree pitch.

Install the solar panel charge converter somewhere out of the weather; connect the wiring as described in the instructions.

Run #8 stranded wires from the charge converter to the battery bank.

Turn the charge converter on and make sure the batteries are charging. A voltmeter is sufficient. Mine reads 13.8VDC across the battery terminals in bright sun.

Connect the new well wires to the batteries to ensure the pump works correctly.

If yes, disconnect the pump for now.

water-flow-detail

Drawing 4 – Water Flow Detail:

Connect the remaining PEX to the pitless adapter outlet, tape the pump wire to the PEX, and bury the entire run below the frost line for the area.

Run it into your basement or crawlspace using whatever critter-proof method you wish.

Install a large water container in a location above your typical faucet height. The higher the location the greater the water pressure.

I’ve been experimenting with a water-bed mattress because, 1 – I had it already, 2 – it distributes weight well.
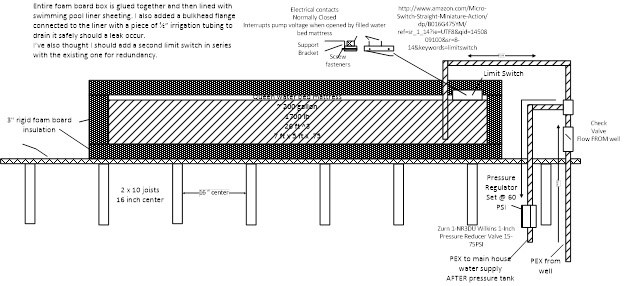
storagedetails

Drawing 2 – Storage Details:

Run the PEX and wiring up to whatever storage container you are using, install the check valve, (flow toward the storage tank!), then the PEX Tee after the check valve, and then from the check valve outlet side into the tank, using suitable fittings to provide for a secure, leak free connection. Inside the container, if it’s not flexible like the mattress, install an addition piece of tubing that just barely reaches the bottom of the container.

Install the limit switch with a float or similar to open the pump circuit when the water level reaches the maximum desired height in the container. Typically you would use the normally closed contacts that will open when the float is lifted. There is a multitude of ways to do this, I happened to have the switches already.

chargedetails

Drawing 3 – Charge Details:

Now run the wiring to the batteries, and connect, observing the correct polarity as during the initial test.

On the original house water supply plumbing cut and insert a tee in the line from the pressure tank going to the house plumbing. Install one of the gate valves in the Tee side going to the new storage. The object is to connect the new storage container outlet Tee to the standard supply plumbing after the pressure tank check valve, see drawing 4.


Other self-sufficiency and preparedness solutions recommended for you:

Healthy Soil + Healthy Plants = Healthy You

The vital self-sufficiency lessons our great grand-fathers left us

Knowledge to survive any medical crisis situation

Liberal’s hidden agenda: more than just your guns

Build yourself the only unlimited water source you’ll ever need

4 Important Forgotten Skills used by our Ancestors that can help you in any crisis

Secure your privacy in just 10 simple steps

A perennial problem faced by suburban and rural dwellers is obtaining water in the absence of utility provided electric power. Standby generators require fuel of some type, which will eventually

Sandbags have been used for a long time to keep us safe in dangerous situations. Safe from rising flood-waters and from incoming rounds in combat. I started thinking about sandbags in terms of home security and the dual purpose they fill struck me. In some places, the threats of floods from winter’s ice thawing is a real and present threat to everything someone may own. Knowing how to build a proper sandbag wall would be important if you are faced with rising water.

Additionally, sandbags could be used in a complete and total collapse of society to augment our poor security defenses in most homes. Don’t have an underground retreat stocked with food and water? Perhaps you can build defensive positions on your property with a lot of hard work and several hundred sandbags. They can stop small arms rounds pretty effectively and are a simple plan (not easy) as a last resort.

It’s official. This is now the prepper’s “go to book” saving them time and money on costly doctor visits. Details and how to get your copy here

How to Use Sandbags

Sandbaglego

It’s like Legos

The use of sandbags is a simple, but effective way to prevent or reduce flood water damage or build defensive walls. Properly filled and placed sandbags can act as a barrier to divert moving water around, instead of through, buildings. Sandbag construction does not guarantee a water-tight seal, but is satisfactory for use in most situations.

Sandbags are also used successfully to prevent over-topping of streams with levees, and for training current flows to specific areas.  Untied sandbags are recommended for most situations. Tied sandbags should be used only for special situations when pre-filling and stockpiling may be required, or for specific purposes such as filling holes, holding objects in position, or to form barriers backed by supportive planks. Tied sandbags are generally easier to handle and stockpile.

However, sandbag filling operations can generally be best accomplished at or near the placement site, and tying of the bags would be a waste of valuable time and effort. If the bags are to be pre-filled at a distant location, due consideration must be given to transportation vehicles and placement site access.

The most commonly used bags are untreated burlap sacks available at feed or hardware stores. Empty bags can be stockpiled for emergency use, and will be serviceable for several years, if properly stored. Filled bags of earth material will deteriorate quickly.

sandbag-buddies

Sandbag buddies

Commercial plastic sandbags, made from polypropylene, are also available from most bag suppliers. These will store for a long time with minimum care, but are not biodegradable. Thus, they have to be disposed of, or will remain around for a long time. Do not use garbage bags, as they are too slick to stack. Do not use feed sacks, as they are too large to handle. Use bags about 14-18″ wide, and 30-36″ deep.

A heavy bodied or sandy soil is most desirable for filling sandbags, but any usable material at or near the site has definite advantages. Coarse sand could leak out through the weave in the bag. To prevent this, double bag the material. Gravelly or rocky soils are generally poor choices because of their permeability.

Sandbag barriers can easily be constructed by two people, as most individuals have the physical capability to carry or drag a sandbag weighing approximately 30 pounds. Using the methods described below you can construct fighting positions or create barriers around windows and doors for your home.

How to fill a sandbag

Filling sandbags is a two-person operation. Both people should be wearing gloves to protect their hands. One member of the team should place the empty bag between or slightly in front of widespread feet with arms extended. The throat of the bag is folded to form a collar, and held with the hands in a position that will enable the other team member to empty a rounded shovel full of material into the open end. The person holding the sack should be standing with knees slightly flexed, and head and face as far away from the shovel as possible.

This book offers real-life solutions for the average person. That’s where the power lies. Get you copy of The Doomsday Book Of Medicine here

Sandbag-for-Web

Filling Sandbags is at least a two person job.

The shoveler should carefully release the rounded shovel full of soil into the throat of the bag. Haste in this operation can result in undue spillage and added work. The use of safety goggles and gloves is desirable, and sometimes necessary.

Bags should be filled between one-third (1/3) to one-half (1/2) of their capacity. This keeps the bag from getting too heavy, and permits the bags to be stacked with a good seal. For large scale operations, filling sandbags can be expedited by using bag-holding racks, metal funnels, and power loading equipment. However, the special equipment required is not always available during an emergency. Remove any debris from the area where the bags are to be placed. Fold the open end of the unfilled portion of the bag to form a triangle. If tied bags are used, flatten or flare the tied end. Place the partially filled bags lengthwise and parallel to the direction of flow, with the open end facing against the water flow. Tuck the flaps under, keeping the unfilled portion under the weight of the sack.Place succeeding bags on top, offsetting by one-half (1/2) filled length of the previous bag, and stamp into place to eliminate voids, and form a tight seal. Stagger the joint connections when multiple layers are necessary. For unsupported layers over three (3) courses high, use the pyramid placement method.

Pyramid Placement Method

The pyramid placement is used to increase the height of sandbag protection. Place the sandbags to form a pyramid by alternating header courses (bags placed crosswise) and stretcher courses (bags placed lengthwise).

Stamp each bag in place, overlap sacks, maintain staggered joint placement, and tuck in any loose ends. Use the following table to estimate the number of bags required:Height above levee Bags/100 feet

  • 1 foot 800
  • 2 feet 2000
  • 3 feet 3400

Ringing boils

missouri_flood

Sandbags are the weapon of choice for rising waters

A boil is a condition where water is flowing through or under an earth structure (such as a levee) that is retaining water. Free flowing water wants to move to lower elevations. If a levee is stopping flood-waters, the water may be able to find weak points to enter. This action is called “piping”. If the water finds a large enough path, the flow will become visible, and is a serious threat to the integrity of the levee. Most boils occur in sand, silt, or some combination.

A boil is found on the landward side of the levee, or in the ground past the levee toe (the exact distance varies with local conditions). Possible boil sites can be identified by free standing or flowing water (other than culverts, pumps, etc). A boil can be found only by close inspection. A prime indicator is water bubbling (or “boiling”), much like a natural spring. Another is obvious water movement in what appears to be standing water.
Carefully examine the water for movement. Boils will have an obvious exit (such as a rodent hole), but the water may be cloudy from siltation, or the hole very small. If there is any movement in the water, carefully approach the site, disturbing the water as little as possible. Let the water settle, and look at the suspected site. If you see the hole, examine it carefully. If the water flow is clear, there are no problems as yet. If there is no distinct hole, the water flow is not a threat. Monitor the site regularly for changes, and take no other actions.

Flood Fighting: How To Use Sandbags to stop water

A dirty water flow indicates that the soil is being eroded by the water, and that could mean failure of the levee. A boil ring is the best solution. The idea is to reduce the water flow until the water is flowing clear, but not to stop the water flow. This acts as a relief valve for the water pressure; the water continues to flow, but is not eroding the material. If the water flow is stopped, the pressure will remain, and another boil will form.

Ring the boil with sandbags, with the first bags back 1-2 feet from the boil. More, if the soil is unstable. Build the first layer in a circle, 2-4 bags across, and then build up, bringing each layer in. If possible, keep the interior face straight. Build the ring wall with the means for water to flow out, leaving a gap in the wall, or using pipes. Adjust the flows until the water slows, and becomes clear. Monitor the ring wall constantly. Raise or lower the height of the wall as necessary, maintaining a slow, clear flow. The height should be only enough to create enough head to slow flow so that no more material is displaced, and the water runs clear.


Other self-sufficiency and preparedness solutions recommended for you:

Healthy Soil + Healthy Plants = Healthy You

The vital self-sufficiency lessons our great grand-fathers left us

Knowledge to survive any medical crisis situation

Liberal’s hidden agenda: more than just your guns

Build yourself the only unlimited water source you’ll ever need

4 Important Forgotten Skills used by our Ancestors that can help you in any crisis

Secure your privacy in just 10 simple steps

Sandbags have been used for a long time to keep us safe in dangerous situations. Safe from rising flood-waters and from incoming rounds in combat. I started thinking about sandbags

When your supply of freeze-dried food runs out and the survival garden isn’t producing as well as you hoped, there are plenty of food options to be found – provided it is the right season and you know what you are looking for.

This infographic came from UK Oak Doors, but it is a beautiful informative resource for preppers looking to maximize their chances of survival. I know that many of you, myself included have these plants growing in your yard or not far away and if you are looking for an edible plant source when the grid goes down, this list might save you. That is assuming you don’t suffer from Botanophobia.

This list of what plants are safe to eat in the wilderness gives you a nice photograph of the plant, a description of where it is commonly found, which part of the plant that is edible and some additional notes to help you out. Along with great printed resources like Peterson’s A field guide to edible plants, this infographic shows quickly sources of nutrition that may be all around you, even if your garden isn’t cooperating fully.

While I do always consider a fully stocked pantry and a large producing garden, complemented with other sources of protein the absolute best way to prepare, that might not always be possible. It is always great to have options and rely on other sources of sustenance if plan A decides to take a hike.

Hope you enjoy!

When your supply of freeze-dried food runs out and the survival garden isn’t producing as well as you hoped, there are plenty of food options to be found – provided

According to the CDC the prevalence of food and skin allergies has increased at an alarming rate in children under the age of 18 from the year 1997 to 2011. Additionally, they say that Allergic conditions are the most common medical conditions affecting children in the US so it is highly likely that you will have to plan for dealing with allergies in one form or another if the grid goes down. Your plan may involve members of your own family or if you are working within a larger group, chances are that one of the members will have some level of allergic concern.

Allergic Reactions: What’s Normal, What’s Not?

Allergies are common and usually not life-threatening. But there can be cases of anaphylaxis, a severe allergic reaction that needs immediate medical treatment. If you aren’t able to get to medical treatment, you will need to know the difference in a normal allergic reaction and one that will require treatment. If you have a family member who has allergies you will need to take that into consideration when you are planning your family’s medical supplies and even food stores. It is great to have plenty of stored food for your family, but you will also need to take precautions that members with allergies are protected, planned for and you know what to do if they are faced with a serious allergic reaction.

You don’t have to wait for a crisis to use this book. Details and how to get it here

Allergy Symptoms: What’s Normal

Kids with mild allergies (such as seasonal allergies) will usually have these symptoms:

  • Watery, runny eyes
  • Runny nose
  • Sneezing
  • Nasal congestion
  • An itchy rash or hives

AngioedemaAllergy

Swollen eyes due to allergic reaction

These symptoms usually aren’t serious and often work themselves out. Actually, I believe that some types of allergies (not food allergies) are helped by exposure but this is completely anecdotal and is just my opinion. For example, I used to sneeze my head off years ago every time I would cut the grass and it got worse as I got older. A few years ago I started walking outside every day at lunch and since that time; I have not had many allergy symptoms at all. At least they didn’t last more than a few hours tops and they are very infrequent.  I believe that my exposure to the common elements outside that were making me sneeze reduced my allergic reaction to cutting the grass. It’s kind of sad if that is true though because that means I used to spend entirely too much time indoors.

A box of tissues and plenty of water help in some of these situations, but you should stay on the lookout for more serious allergy symptoms (see below), especially in kids who have a history of asthma and severe allergic reactions. For children on an inhaler make sure you have plenty of stores in your medical kit. You don’t know if you may be unable to get to the store again.

Anaphylaxis Symptoms – Much more dangerous

Get medical help right away if possible at the first sign of anaphylaxis. Watch for trouble breathing, low blood pressure, and change in consciousness. Other symptoms include:

  • Hives
  • Swelling of the throat, face, lips, or tongue
  • Tightness in the lungs
  • Wheezing
  • Hoarseness
  • Pale or flushed skin
  • Sweating
  • Weak, rapid pulse
  • Nausea, vomiting
  • Abdominal pain

What Can Cause Anaphylaxis

Foods

Peanuts – Peanuts are the most common cause of food-related allergy death. They can trigger anaphylaxis — a reaction that may be fatal if not treated right away. Symptoms usually start within minutes of exposure. But they can also start within seconds or take hours to develop. You may need to take action at the first sign of swelling, hives, trouble breathing, a rapid pulse, or dizziness. If your food stores involve peanuts or you know your children have this allergy, make sure they are replaced immediately. This is probably something you have done already if the children are yours but may need to adjusted for a larger survival group.

This is a manual that you can use to keep your body vigorously healthy and disease free. Details HERE

Shellfish and Fish – About one half of anaphylaxis cases are related to food. Shellfish, such as shrimp, lobster, and crab are triggers for some people. Shellfish and fish allergies can be so serious that just the cooking vapors can sometimes trigger an allergic reaction. As a reaction gets worse, tissues swell, blocking airways, and people can have deadly heart and circulation problems. If your survival plan has as one of its legs fishing for your food in the ocean, you should make sure this will not affect your family.

Sesame Seeds, Tree Nuts – The tiny sesame seed can cause an anaphylactic reaction. Legumes such as lentils, peas, soy beans, and other beans can also cause reactions. They’re related to the peanut, which is actually a legume. Real nuts such as cashews and walnuts also tend to cause problems for some adults. Make sure you have tried out all of the food you are storing up and if possible, you should be eating your food stores to develop a good rotation system. Finding out you are allergic to beans when you have hundreds of pounds of them stored will not be good.

Dairy and Wheat – In addition to peanuts, children are often allergic to wheat, milk, and eggs. Because triggers can be hidden in other foods, read labels carefully. By law, the eight most common allergenic foods — milk, eggs, fish, shellfish, tree nuts, peanuts, soy, and wheat — and ingredients made from them such as lecithin (soy) and whey (milk) should be listed. All of the hard red winter wheat in your food storage pantry won’t be much good for someone who is gluten intolerant. For someone who has full blown Celiac disease, the initial reaction produces inflammation which damages the lining of the small intestine. This prevents the absorption of some nutrients. If a change isn’t made, weight loss, bloating and diarrhea can start. Neither is good in a grid down scenario.

Drugs

Prescription medicines – Penicillin and other antibiotics are common causes of drug-related anaphylaxis. Chemotherapy drugs, imaging dyes, and muscle relaxants used in anesthesia can also cause problems. To prevent medication-related anaphylaxis, your doctor may suggest allergy shots or prescribe different medications. This is probably less of a concern long term, but could impact you short term if someone has just recently started taking medication like this.

Over the counter pain relievers – Even medications you can buy over the counter can trigger anaphylaxis in some people. Aspirin, ibuprofen, and non-steroidal anti-inflammatory drugs (NSAIDs) are some that may cause severe allergic reactions.

Insect Stings

Bees – Venom from honeybees, yellow jackets, wasps, and hornets cause anaphylaxis in about 3% of Americans. If you have had a reaction to a sting or suspect an allergy, see an allergist about allergy shots. Allergy shots are 97% effective at preventing anaphylaxis from insect stings. Some sources suggest that you should avoid wearing perfume or cologne and bright colors as they can attract stinging bugs. I don’t know how accurate that is, but then again I don’t wear cologne or bright colors usually.

Ants and ticks – Crawling, biting insects like ants and ticks can cause severe allergic reactions just like flying, stinging bugs. Fire ants can inject their venom over and over. Watch out for ant nests to avoid the painful bites of these bugs. Wearing closed-toed shoes, pants, and long sleeves outside may also help you avoid bug bites.

Latex

Latex – Latex-related anaphylaxis is rare. People who’ve had many surgeries and health care workers tend to be most at risk. Triggers can include gloves, IV tubes, syringes, and other items made with natural rubber latex. Even non-medical items like balloons, elastic, and condoms can cause reactions. Look for non-latex, synthetic choices.

Handling an Allergy Emergency

images

Epi-Pen and Auvi-Q are used for immediate treatment of Anaphylaxis

A child who has had a severe allergic reaction should carry an emergency kit that includes an epinephrine auto-injector such as Auvi-Q or EpiPen and you and probably everyone in your group should know how to use the injector. Your child may also be old enough to use it on themselves.

Epinephrine can prevent or reverse anaphylaxis symptoms. If you’ve been prescribed epinephrine injectors, carry two doses with you and practice using them. Make sure you have extra in your Bug Out bags and your Get Home bags. If you think you’re or your child is having an anaphylactic reaction, immediately inject epinephrine.

Anaphylaxis is a severe allergic reaction that needs emergency medical treatment. It can happen in seconds or even hours after contact with something the person is allergic to, like foods, insect venom, latex, or medication. In rare cases, exercise and physical activity also can trigger anaphylaxis.

If an epinephrine shot (such as Auvi-Q or EpiPen) is available, that may temporarily stop symptoms, but it’s not a cure — you still need to get emergency medical care for the person, even if they seems to be OK after treatment. If this isn’t possible, continue to monitor them for signs of another attack.

How to Use an Epinephrine Injector

  1. Inject epinephrine at the first sign of a life-threatening reaction. Do not move the person who’s having symptoms unless he is in an unsafe place.
  2. Have the person sit down, lie down, or stay in the most comfortable position for breathing.
  3. Stay calm.
  4. Be aware that epinephrine may cause short-term symptoms that are like those of anaphylaxis.
  5. If an insect stinger is present, remove it with a gentle brushing motion. Do not pinch the stinger. That may release more venom.
  6. Listen and watch to make sure the person’s airway stays open.
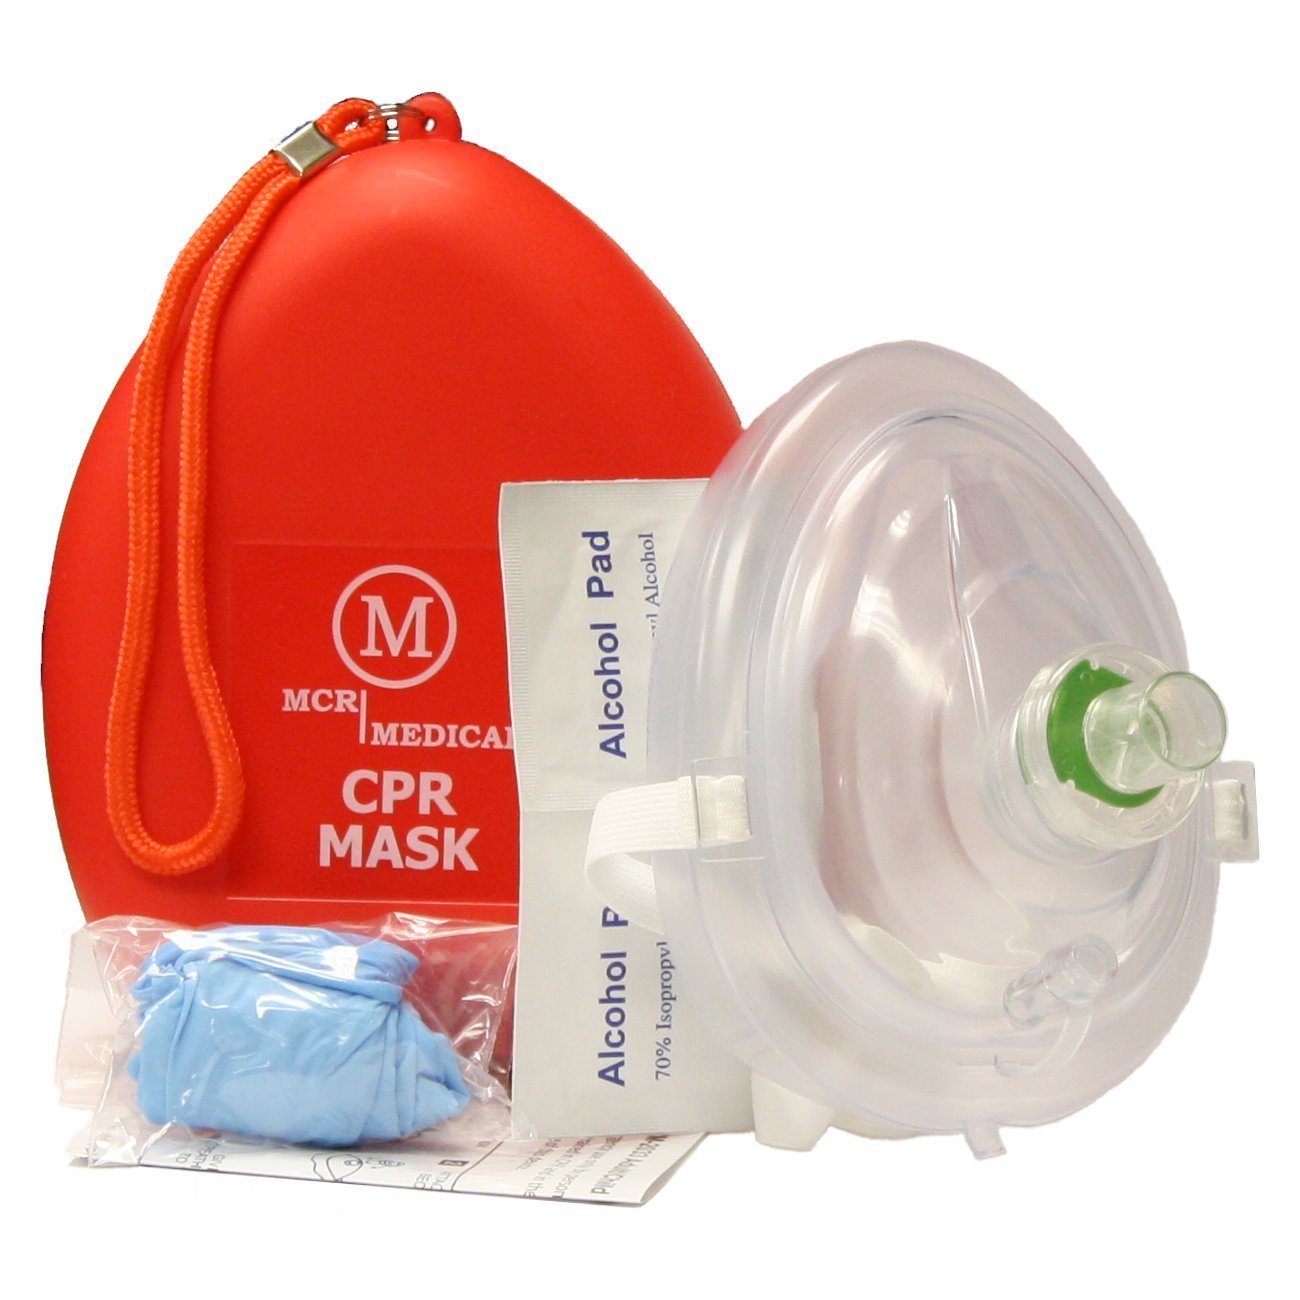
  7. If you are trained in CPR, give it if needed. If the person has asthma as well as allergies, you can give them their inhaler. Do so after you have given them the epinephrine.

In an emergency, a second shot of epinephrine may be used if symptoms persist. Doctors and nurses may also give other medications.

Anaphylaxis: Are You Ready?

  • Make sure you have plenty of injectors and store epinephrine in a dark place and at room temperature. You can probably speak with your doctor to obtain a prescription for more if needed.
  • Check the expiration date regularly. If expired, replace it. But remember, it’s better to use expired epinephrine in an emergency than nothing at all.
  • Check the liquid through the window of the auto-injector. If it is not clear, replace the unit.
  • Have more than one auto-injector available at all times. For instance, keep one at home, in your car, and at your child’s school, if you have a child with allergies. Make sure the person wears a medical alert bracelet or neck tag.
  • If you have a child with allergies, write an anaphylaxis emergency action plan for your any other adults he or she spends time with. Make sure this is part of your preps.

Other self-sufficiency and preparedness solutions recommended for you:

Healthy Soil + Healthy Plants = Healthy You

The vital self-sufficiency lessons our great grand-fathers left us

Knowledge to survive any medical crisis situation

Liberal’s hidden agenda: more than just your guns

Build yourself the only unlimited water source you’ll ever need

4 Important Forgotten Skills used by our Ancestors that can help you in any crisis

Secure your privacy in just 10 simple steps

According to the CDC the prevalence of food and skin allergies has increased at an alarming rate in children under the age of 18 from the year 1997 to 2011.

I believe that each of us has an inner voice. Call it what you will; instinct, hunch, feeling, foresight, or intuition they are all the same. It is a compelling force within us that we feel on an almost imperceptible level when you are quiet and your mind starts to ponder things you normally don’t give a second thought. This inner voice or instinct might be ignored or blamed away on bad tacos but for me and a lot of other people out there, our inner voice is telling us that we need to start getting prepared.

For me, my inner voice or ‘gut feeling’ as I typically call it started acting up around 2007. I don’t know why exactly and I haven’t over-analyzed it, to be honest. For me, I simply started feeling like I needed to take steps to prepare my family. There wasn’t a specific event I was worried about, just a general feeling, perhaps brought on by some realization of how fragile our society is. It was around this time that I really began to research how to start prepping and the journey I started back in 2007 continues to this day.

It’s official. This is now the prepper’s “go to book” saving them time and money on costly doctor visits. Details and how to get your copy here

If you are new to prepping, you must have millions of questions. I know I did and in the beginning, I scoured the internet for prepping websites, survival books and information from a wide array of sources that led me to a lot of insights and some great recommendations. I try to share what I have learned on the Final Prepper every day but even for me, there is no finish line. I am still working on prepping just like millions of other people. Today I want to share some advice for the person who is beginning their own journey and has questions on how to start prepping.

Do you know why you want to start prepping?

Prepping is a word that has only fairly recently become known around the world and it is usually associated with a negative connotation. TV shows like Doomsday Preppers and Doomsday Castle have both helped and hurt the idea of prepping in various degrees but I believe overall most people see the benefits of Prepping and can separate the bizarre actions of some from the common-sense process of prepping itself. Prepping to me is simply taking steps to prepare yourself and your family to better weather disasters. Why do we need to do anything in the first place? Isn’t that what the police and the fire department and government are for?

If you are here on this website, I am sure the answer to that question is obvious. If you have paid any attention to the events of just the last few years there are numerous examples of disasters that caught people off guard where neither the police, nor the National Guard, nor FEMA were able to help in a way that was fast and effective enough to save everyone or to end suffering. The cold hard truth is that in a disaster situation, you are better off relying on yourself than anyone else. Police can become overwhelmed, bureaucracies always have more important things to worry about and the needs of the individual (you) are not first on the priority list. In short, when something bad happens, you need a plan to deal with events if help doesn’t arrive. Relying on anyone in a professional capacity to save you is foolish and it can get you killed. You know that its time for you to get started prepping.

This book offers real-life solutions for the average person. That’s where the power lies. Get you copy of The Doomsday Book Of Medicine here

Start with the basics of getting prepared

There are many types of disasters that can strike. You only have to look at the news to see earthquakes, fires, riots, mudslides, hurricanes, wars, drought and the list goes on and on. Some people want to prepare for a specific event like a tornado and at first, that may seem like the most logical place to start, but what if you are prepared for a tornado and a flood comes instead? What if you are worried about a forest fire, but there is an earthquake? What if you are all set for a hurricane, but an EMP wipes out the electric grid?

There are things you can do to prepare for any event and I recommend you start with these 4 basic necessities. These 4 things are needed for life no matter what happens and if you take care of the four essentials, you will be ahead of 98% of the population.

Food – It’s very simple to know what you need. You need to store as much food as your family needs to eat for the duration of any disaster. Ideally, this would be food that doesn’t require refrigeration like canned or dehydrated food. If your budget allows you to purchase freeze-dried food, this is the simplest option and you can easily store several months’ worth of food under your bed in nice plastic containers. Even though it is the easiest, it isn’t the cheapest and a wiser strategy is to slowly just buy more of what your family already eats. This way, with a good rotation system you always have an abundance of fresh food your family likes. The freeze-dried food is pretty decent, but nothing like fresh food.

This Book Is The Noah’s Ark Of Prepping And It’s Making Americans Healthier by The Day. Details Here

Water – Another easy one. Water is necessary for life and you need a gallon per day for each family member. If you have 4 people in your house you would need 120 gallons of water to last a month. Ideally, you would back this up with a good filtration system like a Big Berkey water filter. Don’t believe you need that much water? Just look at the residents of Charleston WV a few months back or more recently Toledo who were told not to drink their water for weeks. Could you wait that out? Store water now while you have it and it’s plentiful.

Shelter – This is simply a way to keep out of the elements. If you have a home and it isn’t blown away you have shelter, but what if the power is off in the summer or the heat is out in the winter. Make sure you have plans to keep warm and cool. Sleeping bags work great in the winter, but summer there are fewer options. Unless you want to build your own swamp cooler.

Security – Disasters bring out the worst in people, but it doesn’t take a disaster to bring violence to your town. Just recently riots broke out over the shooting death of a teen. Riots break out all the time over sports games. Imagine if the power is out and the grocery store shelves are bare and people are hungry. Make sure you have a way to protect your family from people who either want what you have or simply want to burn and destroy things. I recommend legal firearms for responsible adults.

Research additional topics

What is your learning style? I guess more accurately, what can you use for motivation or ideas? I have been able to pull ideas out of a lot of different places. At the beginning as I was learning how to start prepping, I frequented numerous prepping websites and we have a great list of prepper sites on our resources page. Let me know if you’re interested.

I also bought books. The Doomsday Book of Medicine is the most complete medical guide ever written for non-medical people, it is also a manual that you can use to keep your body vigorously healthy and disease-free. No other book on the market today will teach you all of this, as well as how to make your own wound care solutions, saline solutions, eye irrigant, natural insect repellent, sunscreen, hydrating fluids, and even toothpaste. There has never been a book like this, so easy to read and so full of life saving medical information that cannot be found anywhere else.

Movies are another source of ideas and inspiration although you do have to have a certain tolerance or affection for the end of the world movies. I love them but my wife isn’t a big fan so I have to judiciously watch these. If you are looking for a good prepper movie, you can try the Best Prepper movie list and see if you can find something you haven’t seen before. I have even found movies do a better job of convincing people to prepare in some cases than all the factual arguments you can muster.

What Next?

Once you have the basics under control, there are tons of other areas where you can specialize for lack of a better word. The pages of the Final Prepper are filled with information around various threats, methods and strategies and all the pages are searchable and downloadable.  You can learn about how to pack your bug out bags, vehicle survival kits and even prepper gear reviews. If you have any questions, just comment in the articles and I am sure someone will help you out with ideas and share their experience. Good luck on your journey and keep listening to that inner voice.


Other self-sufficiency and preparedness solutions recommended for you:

Healthy Soil + Healthy Plants = Healthy You

The vital self-sufficiency lessons our great grand-fathers left us

Knowledge to survive any medical crisis situation

Liberal’s hidden agenda: more than just your guns

Build yourself the only unlimited water source you’ll ever need

4 Important Forgotten Skills used by our Ancestors that can help you in any crisis

Secure your privacy in just 10 simple steps

I believe that each of us has an inner voice. Call it what you will; instinct, hunch, feeling, foresight, or intuition they are all the same. It is a compelling

Most preppers recognize the rule of threes, as they pertain to preparedness, to include being able to survive three hours without shelter, three days without water, and three weeks without food. Included in being able to survive three hours without shelter but often neglected, is the clothing. Warm clothing will help keep you from burning calories up at a time when calories may have to be carefully controlled.

When you aren’t getting enough calories, your body has a harder time generating heat and you really need warmer layers of clothing and blankets. Light clothing will help keep you from overheating in heavy labor in summer. Choosing the right clothing may be critical to your survival.

We choose our clothing based on the climate, but we should also remember to prepare for some changes to climate if there is any possibility at all of moving to an area that differs in temperature, humidity, or rainfall. While I have lived most of my life in the high deserts of the West, I did spend five years in Missouri. Northern Nevada and Central Missouri are at about the same latitude and the temperatures are the same. The difference is humidity, and wow, what a difference! I never want to experience the bitter cold of a Missouri blizzard again. Nor do I want even a few hours’ repeat of laboring in the garden at 90 degrees Fahrenheit and 90% humidity. So it may be wise to prepare for extremes. It’s something that many of us don’t consider, probably because we have grown up in a time when the solution to being too warm or too cool hasn’t been to add or remove layers, but to adjust the thermostat. I’m grateful for each morning I wake up to find that the thermostat still works. But I prepare my family for the day that it won’t.

This book could have been called The Replacement for The US Healthcare System. Learn here why

Making the right choices in clothing could be crucial to our survival, so let’s start from the top and see if you are a well-dressed prepper.

Hats

A wide-brimmed straw hat is essential for working outside in the heat of the day. Heat exhaustion and heat stroke are real threats, and they are even more real for the elderly. But heat stroke can also affect those who think they aren’t quite senior citizens yet and still able to put in a good day’s work, or at least a few hours in the garden. Baseball caps and visors are good for shading faces. Beanies are good for all cold weather, but also for sleeping when nights are cool, for those who chill easily. Ski masks/balaclavas are crucial for bitter temperatures and biting winds and blizzards to protect the facial skin from frostbite.

Bandanas

Bandanas are the multi-tool of clothing. But make sure what you get is 100% cotton. Not only can your bandana—which when TEOTWAWKI hits you should be wearing at all times—blot sweat or function as sunblock for your neck, but it can also work as a tourniquet, sling, bandage, signal, preliminary water filter, the list goes on. An entire article could be written just on bandana uses.

Scarves

Choose your scarves carefully. You may want one that can do more than wrap around your neck once or twice. And if you live in colder areas, you will definitely want to upgrade beyond a wool scarf to alpaca or angora fiber instead for something that is much warmer, much softer, and at the same time much lighter.

This book teaches you What To Do When Your Doctor Is Not Around. Follow this link for details

Underwear

ShirtsThese items I just do not want to have to DIY, ever, so these get stockpiled. Fortunately, they are very light and take very little space. Thermals get stockpiled as well. Under Armour is a popular choice. Wool is highly desirable if there is any chance of getting wet. Yeah, we all fear the itch, but there are really high quality merino thermals available. They’re a little pricey, but they will be worth every penny when the need arises.

Of course, everyone has plenty of t-shirts, for everything we have to do. And most have Pendleton-type heavier wool shirts for keeping warm in winter, but make sure you have some long-sleeve lightweight shirts in natural fibers. I really love the very light-weight 100% wool shirts I have. Unlike 100% cotton which I will eventually be able to wring the sweat out of, the light-weight wool shirts are great at wicking perspiration and shielding from the sun.

Pants

While most everyone has plenty of jeans, most of what is sold today is very lightweight and poorly made. What we need are heavy-duty denim jeans, like what farmers wear. Buddy’s Jeans are incredibly durable, and made in the USA. Duluth Trading Company sells “firehose” pants, which are also very durable.

Socks

People sometimes don’t give much thought to the socks. They’re cheap and easily replaced. Unfortunately, they ARE cheap! As with almost everything in the USA, quality has been decreasing over the past few years. Cotton socks in brands that I have bought for years now seem to start falling apart after just a few washings. Because commercially produced high quality wool socks for a family of seven are a bit out of our price range, I am now knitting socks. Regardless of whether you buy commercial or make your own, you must have natural fibers, though you may have some nylon content for durability. Avoid acrylic like the plague. Wear wool socks year round to help control athlete’s foot fungus. Choose angora blends in the winter to have the warmest feet.

Shoes

Everybody in the family should have work boots as well as several pairs of athletic shoes for every day wear. Most shoes are manufactured overseas, and most are rather poorly made and will not last long. When our society collapses footwear will become extremely hard to find. Be sure to have plenty of Shoe-Goo for repairs and an abundant supply of spare shoelaces. Flip-flops are not shoes and should be reserved for showers. Shoes should really be worn at all times, even indoors, to protect from injury.

Hard work is usually best done with heavy duty work boots.

Sweaters

Each family member should have a few sweaters for layering. However, not all sweaters are created equal. For maximum comfort and warmth, you really only want sweaters made from natural animal fibers—wool and alpaca primarily. Cotton and synthetics just don’t keep a body very warm, and if they get wet, they stay wet, whereas if wool and alpaca get wet you will still be able to keep warm.

Coats and jackets

Make sure that your outerwear will keep you warm enough to be outside for extended periods in the coldest of temperatures and in a range of conditions. And make sure you test it in those conditions! I have one jacket my dad bought me that is warm enough for me most of the time, but if the wind is blowing it’s almost worthless. Better to find that out now, before it can’t be replaced.

Coveralls

The family mechanics have lightweight coveralls for dirty jobs. However, everyone in the family has Carhartt insulated coveralls. My husband and son reported that these coveralls kept them very comfortable—almost too warm—as they worked to help a family whose car had gone off the road one Thanksgiving in a miserable Missouri snowstorm.

Gloves and mittens

Of course, a wide variety of gloves is needed. Leather gloves for heavy labor, garden gloves for digging in the soil, rubber gloves for doing dishes and protecting hands from harsh chemicals, latex gloves for caring for the ill and handling bio-hazards, and very warm gloves or mittens for cold weather. Children will need the latter in a variety of sizes to accommodate growth. Also consider having some very warm finger-less gloves for those occasions when having to work with tools outside in cold temperatures.

Aprons

Aprons were indispensable in times past when people had just two or three changes of clothes and when it was all washed by hand. They served two important functions—protecting clothing and reducing the amount of laundry. While we currently have aprons only for cooking and working in the shop, this summer I am also making aprons for eating dinner and working in the garden.

Many preppers frequent thrift stores and garage sales looking for discounted quality items that will help them. Most also seek good quality clothing. However, they often limit themselves to looking for clothing in sizes currently needed. This is a great time to buy for the eventual needs of growing children. A pair or two of shoes in every size for a few years into the future is not unreasonable, and in fact will save you a great deal of money even if society never collapses. Also consider acquiring knit sweaters in sizes you don’t wear and scarves that can be re-knit or felted into other clothing.

Clothing was so expensive in colonial times that suits and dresses were written into our ancestors’ wills. “My black suit to John, my brown suit to James….” “The blue dress to Sarah, my red dress to Elizabeth….” As I prep for economic and societal collapse, I consider the daily life of colonial and pioneer women, living as they did without electricity or indoor plumbing. For them, there was a reason why as soon as the dinner dishes were done, the work day wasn’t over yet, and women sat down to mend clothing and knit socks. Women spent all day cooking, cleaning, and doing laundry, all evening working on clothing. Clothing isn’t glamorous. It’s not exciting. But it is essential to our survival. Choosing your clothing well now will make you and your family much more comfortable when times get difficult.


Other self-sufficiency and preparedness solutions recommended for you:

Healthy Soil + Healthy Plants = Healthy You

The vital self-sufficiency lessons our great grand-fathers left us

Knowledge to survive any medical crisis situation

Liberal’s hidden agenda: more than just your guns

Build yourself the only unlimited water source you’ll ever need

4 Important Forgotten Skills used by our Ancestors that can help you in any crisis

Secure your privacy in just 10 simple steps

Most preppers recognize the rule of threes, as they pertain to preparedness, to include being able to survive three hours without shelter, three days without water, and three weeks without

Why compost or throw out those old brown bananas when you can have the smell of delicious banana oat bread wafting through your house in about an hour?  The prep time on this recipe is less than ten minutes and utilizes stuff you likely have in your pantry right now.  The use of quick oats is a healthy, satisfying addition that I love.

If you don’t have an hour to wait for the baking, your overripe bananas will freeze perfectly, allowing you to use them whenever you’re ready.  You can use whatever kind of flour and oil you prefer, and even sweeten with honey instead of white or brown sugar.

Here’s what you’ll need:

  • 1 c. flour
  • 1 c. quick oats
  • 1 t. baking soda
  • 1/4 t. salt
  • 1/2 c. oil
  • 3/4 c. sugar or honey
  • 2 eggs, beaten
  • 3 overripe bananas, mashed
  • 1 c. raisins or nuts (optional)

First off, preheat your oven to 350° and flour a 9×5 loaf pan.

Mix your flour, oats, baking soda, and salt in a small bowl and set aside.

In a large bowl, mash your bananas and add your sugar or honey, oil, and eggs and stir until well blended.

Finally, add the dry ingredients into the banana mixture and blend thoroughly.  If you want raisins or nuts, now is the time to add them.

Pour into your greased and floured pan and bake for 60-70 minutes until a toothpick inserted in the center comes out clean.

That’s it… just let it cool for ten minutes or so and dig in!  Mmmmm… banana bread.


Other self-sufficiency and preparedness solutions recommended for you:

Healthy Soil + Healthy Plants = Healthy You

The vital self-sufficiency lessons our great grand-fathers left us

Knowledge to survive any medical crisis situation

Liberal’s hidden agenda: more than just your guns

Build yourself the only unlimited water source you’ll ever need

4 Important Forgotten Skills used by our Ancestors that can help you in any crisis

Secure your privacy in just 10 simple steps

Why compost or throw out those old brown bananas when you can have the smell of delicious banana oat bread wafting through your house in about an hour?  The prep

Do not eat any mushroom without checking in person with a local, live, mushroom collector.

The first time I thought I saw the Ringless Honey Mushroom was on my neighbor’s lawn. The only problem was this species of mushroom grows on wood such as stumps or on decomposing roots. I had lived in the neighborhood 13 years and didn’t remember a tree on the lawn … though maybe there was a stump there when I first moved in…

Notice a slight raise and more dark hairs in the middle of the cap. The cap’s flesh is also white (see inside crack) to help you distinguish it from the toxic orange-flesh Jack-O-Lantern. Photo by Green Deane

Next time I thought I saw it was 200 miles away in West Palm Beach growing on an Eastern Cedar stump, or Southern Cedar … much the same thing (Junipers.) Ringless Honey Mushrooms usually don’t like conifers (its the pitch I imagine. I’ve also noticed them growing on Camphor stumps — pass — and on banyan roots… maybe worth trying as that is the fig family.)  The third time, however, was a charm, about a mile from my house growing on oak stumps in an area that had been cleared a couple of years earlier. It was a mushroom mine, so to speak. When I took a Mushroom Certification class in late August in North Carolina they were everywhere. Locally they like October through December with November being the heaviest month. 

Gills are widely spaced, touch but don’t run far down the stem, and stain or turn brown or brownish pink when bruised or aged. Photo by Green Deane

The Ringless Honey Mushroom, Armillaria tabescens,  is a southern stand-in of a very common mushroom in North America and Europe, Armillaria mellea. which is also edible. The A. mellea, however, has a ring around the stem — an annulus — as almost all Armillaria do. The Ringless Honey Mushroom does not have a ring and there is also one ringless species in Europe, the A. ectypa. It is rare and classified as endangered in some areas. I note A. ectypa only grows in acidic marshes and is listed as edible and non-edible…. not good form to list an endangered species as edible. A. mellea is an infrequent Florida mushroom in the spring. Though looking similar again it has an annulus and the cap is tacky.

Ringless Honey Mushrooms grow on wood, in this photo around an oak stump. Photo by Green Deane

As mushrooms go the Ringless Honey Mushroom is one of the easier to identify. The Ringless Honey Mushroom grows on wood, preferably oak. But has also be found growing on Buckeyes, Hemlock, Hollies, Junipers, Sweetgums, Plums,  Apples, Perseas, Maples, Pines, Ash, Alders, Almonds and Walnuts. Ringless Honey Mushrooms found growing on Hemlocks and Buckeyes are known to cause digestive upset. I would avoid those growing on plums, apples, almonds and hollies. Those trees can have some nasty chemicals in them including hydrocyanic acid. However a mycology professor told me these mushrooms should not pick up any bad chemicals from such trees. Oak is the most common and safest bet.

The spore print is white which helps separate it from the hallucinogenic Gymnopilus spectabilis (orange-brown spores) the deadly Galerina autumalis (brown spores) and Pholiota species (brown spores.) Photo by Green Deane

James Kimbrough in his book “Common Florida Mushrooms” says of the Ringless Honey Mushroom: “This is the most common late fall-early winter mushroom in Florida. It causes mushroom root-rot of numerous tree and shrub species, and is especially critical in the die back of oaks. It is seldom found in summer months, but appears in striking numbers as soon as late fall rains commence. It is a choice edible species, but because of its toughness, must be cooked longer than the average mushroom.” I would add one usually does not eat the stem. The mushroom is also a good candidate for drying. I fry them but have also parboil them for 15 minutes or so first, drain, then used.

Gills are knife-thin, sometimes forked, stems are white or light yellow on top tapering downward to darker stems. Photo by Green Deane

As for the scientific names, Armillaria (ah-mill-LAIR-ree-ah) is Dead Latin for “little bracelet.” Tabescens (tay-BESS-sins) mean decomposing. One would like to think it is called “little bracelet” because it can embrace an entire small stump but no. It is because of a bracelet-like frill on the fruiting bodies. And I don’t know if tabescens refers to helping wood decompose or the brown-black pile of dried muck the mushroom becomes when reproduction is done. They are called “honey mushrooms” because their color is similar to honey. And it should be added that not all categorizers of mushroom like “Armillaria” for the genus and prefer “Desarmillaria.”

Ringless Honey Mushrooms are cespitos, growing in a cluster. Also note how light-colored the young stems are. Photo by Green Deane

Kimbrough describes Ringless Honey Mushroom this way: Pileus is 2.5-10 cm, convex to plane, sometimes sunken at the disc with uplifted margins; yellow-brown with flat to erect scales. The lamellae are decurrent, somewhat distant, staining pinkish brown with age. Stipes are 7.5 to 20 cm long, 0.5 1.5 cm wide, tapering towards the base; off-white to brownish in color, lacking an annulus. Spores are white in deposit, broadly ellipsoid, 6.0-10 x 5.0-7.0 um, not staining blue in iodine. Basidia are clavate, 30.0-35.0 x 7.0-10.0 um, with four sterigmata. Normally I would translate those technical terms into plain English but with mushroom you should also learn the argot. But to give you an idea: The cap is one to four inches across, shaped like an upside down bowl to flat across the top with the edge turned up…

David Arora author of Mushrooms Demystified, describes the related Armillaria mellea as an edible spring mushroom then adds Armillaria tabescens is the same except no ring (annulus) and a dry cap.  He provides more details:

Mature caps can range from two to four inches across. Photo by Green Deane

Cap: 3-15 cm broad or more, convex becoming plane or sometimes broadly umbonate or in age uplifted; surface viscid or dry, usually with scattered minute dark brown to blackish fibrillose scales or erect hairs, especially towards the center; color variable: yellow, yellow-brown, tawny, tan, pinkish brown, reddish-brown et cetra.  Flesh thick and white when young, sometimes discolored in age; odor mild, taste usually latently bitter.

A young cap’s color is uniform without any brusing or aging towards brown-pink. Photo by Green Deane

Gills: Mushroom perfectionists can really rattle on about gill attachment, which are admittedly important. Start with the word F.A.D. Free, Attached, Descending. Gills are one of those three but there are nuances. Do they touch with an upward swing or square one? If they don’t attache the stem at al they are free.  So these are “adnate” meaning square on to slightly decurrent (running down the stem some) or sometimes notched — half adnate;  white to yellowish or sordid flesh-color, often spotted darker in age. Stalk: 5-20 cm long, 0.5 3(5) cm thick, tough and fibrous with a stringy pith inside; usually tapered below if growing in large clusters, or enlarged below if unclustered and on the ground; dry, whitish (above the ring in the A. mellea) soon yellow to reddish brown below and often cottony-scaly when very young.  Spore print white 6-10 x -6 microns, elliptical, smooth, not amyloid.

Habitat: In small or massive clusters on stumps, logs, and living trees, or scattered to gregarious (occasionally solitary) on ground — but growing from roots or buried wood; common on a wide variety of trees and shrubs… on oaks trees the mycelium (mushroom roots) can frequently be seen as a whitish fan like growth between the bark and wood.

Whether young or middle aged select only firm caps for cooking. Stems are tough and fiberous. Photo by Green Deane

Arora says (of the A. mellea which he also says describes the A. tabescens) is eminently edible. Use only firm caps and discard though stalks (which are used for stock.) It is an abundant food source, crunchy in texture, and a very passable substitute for the shiitake in stir-fry dishes. The bitterness cooks out, but some forms are better than others. Arora recommends because of its various  forms beginner should pick only those growing on wood.

There are three or four similar-looking mushrooms which are toxic. The Galerina autumnalis has a ring, is smaller, and has brown spores. The Pholiota species also have brown spores. Gymnopilus have rusty-orange spores. The Sulphur Tuft, Hypholoma fasciculare, which likes to grow on wood, has purple-brown spores. That leaves Jack-O-Lanterns, Omphalotus.

Jack-O-Lantern mushrooms, above,  look similar but the cap’s inner flesh is orange or yellow, not white like the Ringless Honey Mushroom. The Jack-O-Lantern can cause severe gastric distress.

“Jacks” are similar but in age can become vase shaped. More importantly their color is shades of orange or reddish-orange, occasionally yellow orange or one species olive orange. The cap is smooth, the Ringed Honey mustard has small black hairs. Also the gills run down the stem strongly whereas in the Ringless Honey Mushroom the gills meet the stem or run down only a little. The flesh of the Jack-O-Lanterns is about the same color as the cap whereas the Honey Mushroom cap is tan/brown and the flesh is white.  If you’re healthy Jacks won’t kill you but will cause severe gastrointestinal illness. Fresh Omphalotus gills can glow faintly in the dark. I’ve seen this several times. As the mushroom ages it loses the ability to glow so don’t rely on it. Some folks mistake Jacks for Golden Chanterelles but Chanterelles when cut are white inside (like the Honey Mushroom) and do not have true gills but rather ridges.

From the kitchen of James Kimbrough: Mushroom Meatloaf.

Young Armillaria tabescens. Photo by Green Deane

2 pounds of Armillaria mellea or A. tabescens
1 Large onion
2 Tablespoons butter
1/2 Cup of dry bread crumbs
2 Eggs, lightly beaten
1/4 Butter melted
1/2 Teaspoon salt
Dash of pepper

Saute half of the onion in two tablespoons of butter until golden brown. Save several large mushroom caps for garnish. Chop remaining mushrooms, including stems and remaining onions; mix with bread crumbs, salt, pepper, and remaining butter. Stir in eggs and sauteed onions. Press entire mixture in a well-greased loaf pan. Arrange mushrooms caps on top and press slightly. Bake for one hour at 350 F. Let stand several minutes; slice and serve with mushroom gravy.

The post Ringless Honey Mushrooms appeared first on Eat The Weeds and other things, too.

Other self-sufficiency and preparedness solutions recommended for you:

Healthy Soil + Healthy Plants = Healthy You

The vital self-sufficiency lessons our great grand-fathers left us

Knowledge to survive any medical crisis situation

Liberal’s hidden agenda: more than just your guns

Build yourself the only unlimited water source you’ll ever need

4 Important Forgotten Skills used by our Ancestors that can help you in any crisis

Secure your privacy in just 10 simple steps

Do not eat any mushroom without checking in person with a local, live, mushroom collector. The first time I thought I saw the Ringless Honey Mushroom was on my neighbor’s lawn.

I think it’s fair to say that we all wish we were better shooters, and we all have things we can improve on. Having a drill we can dedicate to will advance our shooting capabilities tremendously.

Well, over the past several years I’ve been lucky enough to train with some of the best instructors around, and even been allowed to share some of my own meagre knowledge with students looking to further their shooting skills.

Towards that end, I’m always interested in the best shooting drills to improve my own skills, as well as the best stuff to use when I’m teaching someone else. Which brings us to our topic for today.

These are the drills I work on every time I’m practicing at the range, and they train skills that are important for all types of shooting, from defensive-focused shooting to competition. These are the shooting drills that will make you a better shooter, and make sure you’re ready for anything that life, or a competition match director, can throw at you.

Let’s get to it.


The Proper Shooting Mindset

First thing’s first, we have to talk about the right mindset to get into before you start. Before I start my training or begin a class, I always want to focus on my goals. Am I trying to get ready for a competition, or am I working on drawing from a holster? Do I need to get my split times down, or do I need to practice reloads?

There are so many things that go into shooting well in any environment, and if we start changing lots of things at once, it can be difficult to know what’s helping and what’s not.

It’s also easy to develop bad habits if our form isn’t correct, so I always want to start and end each training session with accuracy. Ten rounds, smallest group possible, unlimited time. Simple, basic, and absolutely critical.

At the end of the day, hitting the target is the most important thing (after being safe) so I want to make sure I’m always working towards getting better there. This is something I started because of Mickey Schuch from Carry Trainer.

If you’re not familiar, definitely check out his stuff. Carry Trainer routinely posts videos of entire classes online, and he has a lot of good other stuff besides.

Taking a full minute or more to try and get ten rounds on paper as close as possible from a short distance is a great way to practice fundamentals and give yourself a kind of reset between other drills, especially with a handgun.


Recommended Training Gear

There are a few things I think everyone should have when training with firearms for serious use: good targets, snap caps, and a shot timer.

Steel targets are great, and for paper targets make sure you get either an IDPA-style target or something like the B27-style human silhouette targets.

Snap caps or dummy rounds, even empty cases, can be used in a variety of ways from setting up malfunction drills to dry-fire training. I keep some in my range bag at all times. Speaking of range bags, we have a great acrticle detailing the best range bags on the market right here.

shooting drills

For a shot timer, I use the Competition Electronics Pocket Pro. This allows me to time myself between shots, and to see measure my reaction times when readying or drawing the gun and shooting or reloading and shooting.

Reloading Drills and Transitions

Whatever kind of gun you have, be it pistol, rifle, or shotgun, you need to practice reloading it under pressure.

In a match, this is going to be one of the biggest things you can do to improve your stage times aside from getting all clean A-zone hits. In a combat situation, reloading can be the difference between life and death. Here’s Doug Koenig, who is a better shooter than I will ever even come close to being, showing you the basics.

Now, there are four types of reloads you need to be aware of, and you need to practice all of them.

First the empty reload  Also called a slide-lock reload, or an “oh shit!” reload. This is where the slide or bolt is locked back on an empty magazine and you need to replace it.

A variation of this that’s more competition-focused is a speed reload.

Speed reloads are usually only done when you’ve identified a transition point in a stage, say moving from one shooting box to another, and you want to reload during that transition, even though you aren’t yet out of bullets.

Next, we have the tactical reload. This is more of an administrative task and is done during a lull, or when you’re in cover. This is also called a reload with retention.

Basically, you get to a point where you realize you’re about to be out of ammo, so you duck into cover, and swap a fresh mag for your almost-empty one.

When you do this, you should be retaining the partially-empty magazine in your support hand as you bring up the new mag, and then transitioning the partially spent mag to a pouch or pocket after seating the new one.

This is different from the speed reload where you just let the partially-empty mag hit the ground and leave it.


New York Reload

As anyone who played Call of Duty will tell you, switching to your pistol is always faster than reloading. A New York Reload (I swear I didn’t makeup the name, it’s a Massad Ayoob thing) is simply transitioning from one firearm to another.

Mas used to teach this specifically in regards to switching from a primary pistol to a backup revolver, but I think in more modern contexts its better to practice it as a transition from a rifle or shotgun to a handgun.

To practice, load a round in your long gun and at least one in your pistol. Put one shot on target with the long gun, let it fall across your body on a sling, and then draw your pistol and place one to two rounds on target.

This one is good for competition as well as self-defense, and is a good way to get used to work on clearing your holster as well.


Rifle/Shotgun Malfunction Drill

Any gun can fail, no matter how close to Perfection it may be, so it’s important to know what to do when yours eventually goes down.

With a long gun, I think your malfunction drill should be a NY reload. If you’re carrying a rifle and a handgun, you’re probably knowingly heading into harms way one way or another, and speed is of the essence when addressing a malfunction.

Transitioning to a pistol gets you back into the fight quickly, and allows you to stop the threat. Then you can go see what’s wrong with your rifle.

To practice, load up a mag with a snap cap somewhere in the mix, and when your gun goes click instead of bang, transition to your pistol and get your hit with that, then address the malfunction.


CCW Malfunction Drill

For the average civilian carrying a handgun, things are a little different. Your first option should be a speed reload in the event of a malfunction. Drop the mag, rack the slide, insert new mag, continue on.

What if you don’t have an extra mag and your gun goes click instead of bang? Tap, rack, bang!

Smack the heel of your hand into the baseplate of your magazine to ensure its seated, pull back on the slide or charging handle, try to shoot your target again.

To practice this, get out your snap caps and mix one in with your range ammo in a mag, or better yet, have someone else do it. Make sure you don’t know when the dummy round is going to come up. When it does, practice your malfunction clear and get another shot on target as quickly as possible.


Shooting Drills

These are drills you can practice with any firearm, and help you to get proficient with weapon manipulation and handling. In a high-stress situation, whether you’re in combat or competition, or even sitting in a deer stand scoped in a trophy buck, you’re going to default to your lowest level of proficiency.

In other words, your worst performance on a flat range is probably still going to be better than you can do when the heat is on. Keep that in mind at all times. These drills are essential for making sure that even your very worst is still good enough.


Up Drill/Draw

This is the simplest thing you can do, but it also cements the basics. Start with your pistol holstered, or your rifle/shotgun in a low ready. When you’re ready, bring the gun up and put one round in the center-mass or A-zone of your target. Bring the gun down or holster. Continue doing that until you get bored and then keep doing it a while longer.

This seems simple, but this is the foundation of everything you’re going to be doing, and working through an entire magazine this way will do wonders for you in the long run.


Failure Drill

Also called a “Failure to Stop” drill or a Mozambique drill, this is the classic two to the chest, one to the head drill that we see taught all over.

For this drill, start from a low ready or a holster. I like working with a shot timer, but you can easily get a buddy to call start, or just go on your own time.

Bring the gun up, put two rounds into the upper chest as fast as you can, and then follow it up with one carefully aimed shot to t-box. What’s the t-box? I’m so glad you asked.

The t-box is God’s off switch, specifically put into human beings so that other human beings can shut them down should the need arise. It gets its name from its shape. Imagine drawing a T-shaped box around someone’s eyes and nose. That’s the T-box.

Shooting Drill

A round of pretty much any caliber enters through there, and nerve impulses simply stop. A simple “headshot” isn’t always enough to stop an attacker, and I know of several cases of people taking shots to the jaw, forehead, or what have you and continuing to not only walk and talk, but fight back.

The point of this drill is to give you a rock-solid way to put an attacker down, no matter the amount of drugs, adrenaline, or religious fanaticism that may be involved.

Those first two shots are meant to slow the attacker down, allowing you to then place that third carefully aimed shot right where it needs to go to stop the threat. If you want to get an idea for the targets you’re aiming at, you can use a standard 8.5”x11” piece of printer paper for a chest zone, and a 3.5”x5” index card for the t-box.

Remember when you’re doing this, we aren’t looking for two rounds touching on the chest target. The goal here is to just simply shoot the bad guy (or gal) before they shoot you, and do so in a place that’s easy to hit, and will take their mind off shooting you.

Rule one of any gun fight is simple: Don’t Get Shot. The easiest way to follow rule one is to shoot them before they can shoot you. All the other high-speed tactical operator stuff is irrelevant if you can’t get this part down.


Box Drill

Stepping up to something a little more difficult, we have the box drill.

This is essentially a failure drill on two targets at the same time. Start with two targets spaced two or three yards apart, with your gun lowered or holstered.

Bring the gun up, place two upper-chest shots on one target, then place two upper chest shots on the second target, then t-box the second target, before transitioning back to t-box the first target. This should form a rectangle or box with your shots, hence the name.

This is a good practice for dealing with multiple attackers, and will help with transitioning from target to target. This is good for competition scenarios, and great for keeping you alive when you get jumped in a dark alley.

I am also a firm believer in the idea that anyone worth shooting once is worth shooting more than once, and practicing this will keep you from potentially freezing up after firing the first shot. It happens more often than you’d think.


Where to Go From Here…

Practical experience trumps everything you can do on your own on a static range. Take a class, join IDPA or USPSA, and get out there and shoot. Shoot dynamically, and shoot often. Don’t be afraid to push yourself, because that’s how you get better.

It’s also a hell of a lot of fun.

Another thing to remember: fast is good, accurate is better, fast and accurate is best. Focus on getting your accuracy down first, and get the movements down, and speed will come. Trying to be John Wick when you’re starting out is a good way to cement bad habits, and it’s a lot harder to unlearn bad habits than it is to take the time to learn good ones to start out with.


Parting Shots

These are the drills I work on almost every day, and this is what I work on with everyone I teach. These are simple, foundational things, but they will absolutely make you a better shooter, and may even save your life if you have to wield a firearm in self-defense.

What do you think of these drills? Do you have another that you think should be included? Let us know!

The post The Best Gun Drills To Become A Better Shooter: Benefits Of Each Drill appeared first on GunBacker. Kudos and thanks. We’re just paying it forward.


Other self-sufficiency and preparedness solutions recommended for you:

Healthy Soil + Healthy Plants = Healthy You

The vital self-sufficiency lessons our great grand-fathers left us

Knowledge to survive any medical crisis situation

Liberal’s hidden agenda: more than just your guns

Build yourself the only unlimited water source you’ll ever need

4 Important Forgotten Skills used by our Ancestors that can help you in any crisis

Secure your privacy in just 10 simple steps

I think it’s fair to say that we all wish we were better shooters, and we all have things we can improve on. Having a drill we can dedicate to

Do you have these seven basic first-aid items? Recent events reveal the importance of carrying first aid items at all times. The discussion of rendering emergency first-aid to someone often falls into the two categories of general first-aid and trauma first-aid. The U.S. Army discovered that trauma first-aid would be more common in a combat environment. Consequently, they adopted the Improved First Aid Kit (IFAK), which became known as the Individual First Aid Kit. The IFAK is essentially a trauma kit. Therefore, there are seven items to find as a foundation to build any size first aid kit from a personal kit to a group kit.

1. Tourniquet

Nearly all of the survival and preparedness experts agree that a tourniquet is a core item for any first-aid kit. A tourniquet helps stop bleeding to a severely injured extremity. However, improper application of a tourniquet can cause more injury, permanent loss of a limb, or even death under extreme circumstances. Thus, you should get certified first-aid training through the Red Cross or other authorized medical training organizations on the proper use of a tourniquet.

There are several versions and styles of the tourniquet. The tourniquet that is easy to employ is the CAT Tourniquet. CAT is an acronym that stands for Combat Application Tourniquet. These are currently in use with military and law enforcement organizations. There are other kinds of tourniquets, such as the ratchet tourniquet, the rapid application tourniquet (RAT), and the stretch-wrap-and-tuck (SWAT) tourniquet. However, whichever one that you prefer, a tourniquet should be an item in any first aid kit.

2. Cutting Device

Emergency first-aid may require cutting clothing away from an injury. Therefore, cutting is an essential task in first aid. An option for a cutting instrument is the Leatherman® Skeletool® RX. It is small enough that it will fit into most first-aid pouches on the market. However, if you cannot afford this multitool, then a quality pair of medical shears or scissors are a good option. Cutting is an essential task for rendering aid to a traumatic injury. A decent cutting instrument is helpful to enable this task. Therefore, a cutting tool of some type should be in any first-aid kit.

3. Disposable Medical Gloves

The wearing of medical gloves is vital for both the one giving first-aid and the one receiving the aid. Medical gloves help to reduce the transferring of germs into a person’s open wounds from the hands of the one rendering aid. They also reduce the risk to first-responders from absorbing blood-borne pathogens through the skin of their hands that an injured person may have in their system.

4. Self-Adhesive Bandage Wrap

Self-adhesive bandage wrap is a critical part of your first-aid considerations. The primary reason for its usefulness is that it can be applied to a wide variety of emergency medical applications. Self-adhesive bandage wrap is useful for making hasty pressure bandages, wrapping cuts with gauze, securing slings, and making slings. There is no glue-type adhesive. Therefore, these bandages work well in arid environments.

5. Quick Clot Gauze

Quick Clot is a recent development in the medical field. It officially goes by the name of hemostatic gauze. The clotting agent, Kaolin, helps to enable the blood to thicken. Therefore, it is terrific for stopping the bleeding on deep cuts, gashes, and penetration wounds to the body upon which a tourniquet is not necessary. Z-Medica is the manufacturer of Quick Clot products. Quick Clot should be part of your first-aid kit considerations.

6. Disposable Medical Face Mask

Many airborne contaminants and pathogens are floating in the air. We breathe them in and exhale them out every day. A medical mask should be part of your baseline considerations when building any first-aid kit. These masks do for the respiratory system that the medical gloves do for the hands. They help reduce the risk of breathing out germs into the open wounds of a person or breathing them in if the patient has an illness. Some types of medical masks have a clear plastic shield attached to prevent blood-borne pathogens from entering the body through the eyes. Therefore, a disposable medical face mask should be part of your first-aid kit loadout.

7. Israeli Compression Bandage

Bandages have been part of first-aid kits since their development. The military understands that the availability of bandages is a matter of life and death for the battlefield wounded. The increase in adverse situations in our contemporary era calls for the availability of bandages in everyday life. Consequently, an essential kind of dressing is the pressure bandage. A person knowing how to apply a pressure bandage to a severe bleeding injury efficiently is a critical task to master.

The best compression bandages on the market are the Israeli Compression Bandages. They are effective and easy to apply to an injury. The older, Vietnam era, pressure bandages were useful but could be cumbersome to use in a stressful situation because of the way they had to be wrapped and secured. Thus, you should consider keeping an Israeli Compression Bandage in all of your first-aid kits. Furthermore, you should always get first-aid training from a reputable organization, such as the Red Cross, before attempting to apply any pressure bandage.

Final Thoughts

First-aid kits are becoming an essential element to possess in the lives of everyday people. The rise in violent criminal activity in our nation has made people more aware of the necessity of keeping first-aid kits available. The seven items in the above discussion should be the foundation upon which to build your own first-aid kit. You need to get certified first-aid training through a reputable source before attempting to render any kind of medical aid to someone. The only exception should be those already well-rehearsed in giving first-aid to someone, such as military personnel, combat veterans, medical and law enforcement personnel. Once you receive training in first-aid, build your kit, then, keep it handy and ready for use.

The post Do You Have These Seven Basic First-Aid Items? appeared first on SIGMA 3 Survival School.


Other self-sufficiency and preparedness solutions recommended for you:

Healthy Soil + Healthy Plants = Healthy You

The vital self-sufficiency lessons our great grand-fathers left us

Knowledge to survive any medical crisis situation

Liberal’s hidden agenda: more than just your guns

Build yourself the only unlimited water source you’ll ever need

4 Important Forgotten Skills used by our Ancestors that can help you in any crisis

Secure your privacy in just 10 simple steps

Do you have these seven basic first-aid items? Recent events reveal the importance of carrying first aid items at all times. The discussion of rendering emergency first-aid to someone often

Gun ownership is on the rise for American women. Concealed carry experts recommend carrying your weapon on your body at all times for self-defense.

This recommendation rules out purses, handbags and ankle holsters unless you only wear loose pants. Carrying in a bag can be a suboptimal choice for some people: if you have to be separated from you bag, or it gets lost/stolen, you’d have the headache of a missing bag and the horror of a missing firearm. Thus, women who want to concealed carry more effectively will have to find another option. In this case, we’re going to be looking at pants that are specifically designed for women who want to concealed carry a firearm.


Popular CCW Options For Women

The two most popular locations for ladies are inside the waistband (IWB), outside the waistband (OWB).These locations are easy to reach quickly and make it harder for an attacker to take your weapon.

However, these safety rules create a challenge for the carrywear industry.Most carrywear is designed to fit a man’s body, and many are of a distinctly utilitarian style that some women might not find appealing. This means that in both cut and fashion, men’s pants really won’t fit the bill for women’s concealed carrying.

Women on average have wider hips and shorter torsos than men. Moreover, wide hips cause the gun to tilt sideways and may cause gun prints on your clothes.

These two facts mean women need special accessories to carry their weapons without sacrificing safety, comfort, and concealment. In the last couple of years, there has been a steady rise in carrywear products marketed to women.

For your convenience, we’ve compiled a top 10 list of concealed carry pants. Taking a look at our list, we hope you can find something that fits your needs and makes some fashion sense as well.


Graystone 5.11 Gun Concealed Carry Women’s Concealment Leggings

Product

Graystone 5.11 Gun Concealed Carry Womens Concealment…

Top Pick

  • 73% Polyester, 27% Spandex
  • MAXIMUM CONCEALMENT: Comfortable holster leggings spandex design…
  • EASY-REACH QUICK DRAW: Specially designed front and back pockets…
  • Will not fall out during daily activities
  • Available in Camouflage

Our rating

Details

  • 73% Polyester, 27% Spandex
  • MAXIMUM CONCEALMENT: Comfortable holster leggings spandex design…
  • EASY-REACH QUICK DRAW: Specially designed front and back pockets…
  • Will not fall out during daily activities
  • Available in Camouflage

These leggings are made of polyester and spandex for greater comfort and fit.

The Graystone 5.11s also offer four holster options: two in the back and two in front.

All four holsters are outside the waistband(OTW), which means your gun is on top of the leggings.

Whether you’re right-handed or a lefty, the 5.11 leggings have you covered.

The velcro straps also serve to secure your weapon while you’re on the move.On top of all these attractive features, the Graystone 5.11s still look like standard leggings you might wear to the gym or the store: that’s the goal of concealed carrying in the first place and these pants certainly meet that criteria

You’ll enjoy maximum concealment with a simple t-shirt or jacket which cover the top of the pants, making even a full size firearm a viable concealed carry option. A great choice for a quick grocery, gym session or even dressier occasions with the right pair of boots.These stylish leggings come in black and blue camo and cost under 40$.


AC Undercover Concealed Carry Yoga Pant Leggings Holster CCW Yoga Pant Ref. 613

Product

AC Undercover Concealed Carry Yoga Pant Leggings Holster CCW…

Top Pick

  • Available in Black color
  • Includes two holsters for either front or rear carry
  • Each holster features a retention strap to secure the handgun
  • Enables to carry and conceal small and medium guns
  • They do run small, so make sure you get a size bigger than you…

Our rating

Details

  • Available in Black color
  • Includes two holsters for either front or rear carry
  • Each holster features a retention strap to secure the handgun
  • Enables to carry and conceal small and medium guns
  • They do run small, so make sure you get a size bigger than you…

AC undercover is a big brand in the carrywear industry and the 613 yoga pants are a great addition to their catalog.

They feel soft to the touch without sacrificing durability because of the nylon and spandex blend. These pants offer two holsters at the front and back, at the “kidney’ position in the back and the “appendix” position in the front. The 613 pants are IWB or inside-the-waistband holsters.

You’ll have your weapon close to your body and secured by an elastic waistband.

Also, holsters have a quick-release retention strap, keeping the gun in place as you move about.

The retention strap is also specially designed for a quick draw in case of emergency. This feature in particular makes these leggings a viable choice for concealed carry.

The 613s tend to run a little small so we advise you to go up one size as per the seller’s instructions.

Also, these pants are designed for small and medium guns and may not fit your weapon.

Make sure to check the sizing guide before making a purchase.

The 613s pants only come in black and cost between 33-39$ for a single or 67.5 for a two pack.


ConcealmentClothes Women’s Concealed Carry Gun Holster 3/4 Leggings – Black

Product

ConcealmentClothes Women’s Concealed Carry Gun Holster 3/4…

Top Pick

  • VERSATILE: These leggings are great for a quick work-out or even…
  • COMFORTABLE: Made from a soft polyblend material, these leggings…
  • EASY TO CARE FOR: With this 95% Polyester and 5% Spandex blend…
  • EXTRA POCKETS: The extra pockets on each side are perfect for…
  • GREAT FOR EVERYONE- Not just for police, FBI, DEA, TSA and other…

Our rating

Details

  • VERSATILE: These leggings are great for a quick work-out or even…
  • COMFORTABLE: Made from a soft polyblend material, these leggings…
  • EASY TO CARE FOR: With this 95% Polyester and 5% Spandex blend…
  • EXTRA POCKETS: The extra pockets on each side are perfect for…
  • GREAT FOR EVERYONE- Not just for police, FBI, DEA, TSA and other…

ConcealmentClothes is a CCW specialized brand with shirts, holsters, and pants.

These black ¾  length leggings are for IWB carry, with one holster one at the front and one at the back with a strap to secure your weapon. Also, the leggings have extra pockets to carry your phone or any small accessories. Along with your firearm, these additional pockets would be a great place to keep your carry permit: this is a requirement in many states.

The polyester/spandex construction gives you a decent amount of stretch and recovery.

Despite the strong material, customers report a soft comfortable feel to these pants.

You’ll never worry about these pants losing their shape over time.

Polyester is a cold-weather fabric by nature, so they may not be a good choice if you live in a hot climate, but will be fine in moderate climates. If you wear leggings during the winter or fall, Concealment Clothes is a great, stylish choice.

Since these leggings are designed to keep their shape, make sure you order the right size. You can order them on amazon at less than 30$.


UnderTech UnderCover Women’s Original Concealment Leggings T1553

Product

UnderTech UnderCover Women’s Original Concealment Leggings…

Top Pick

  • Perhaps the most attractive concealed carry option available!…
  • Available in mid-calf length, the ORIGINAL CONCEALMENT LEGGINGS…
  • The OCL is available in Right and Left Hand, XS thru XXXL, BLACK…

Our rating

Details

  • Perhaps the most attractive concealed carry option available!…
  • Available in mid-calf length, the ORIGINAL CONCEALMENT LEGGINGS…
  • The OCL is available in Right and Left Hand, XS thru XXXL, BLACK…

UnderTech UnderCover is a well-known brand trusted by Law enforcement officers all over the world. This brand has a long history of adapting its products to professional standards.

They now offer the T1533 original leggings with an option for left-handed or right-handed customers. Like previous IWB carry pants, the Original Concealment Leggings have a retention band for extra safety.  The exclusive patent-pending design secures the weapon while allowing the wearer to react fast in case of an emergency. If you are active, you can run, jump and exercise in these pants without the worry of dropping your weapon thanks to the thick material.

These leggings cost between $70-$79.99 with free shipping.


Women’s Concealment Shorts by UnderTech Undercover (2X, Black)

Product

Women’s Concealment Shorts by UnderTech Undercover (2X,…

Top Pick

  • Consealment

Our rating

Details

  • Consealment

Shorts offer the greatest variety for carrywear, since they allow you to carry without weary belts.

You can use them while wearing dresses, jeans or even your PJs.

These concealment shorts fit tightly to your body so you can wear them under your regular clothes.

However, there are only two holsters at the back making front carry impossible with this model.

These shorts by UnderTech hide your weapon without the bulk of a belly band or belt holster.

Keep in mind, the holsters fit small and medium handguns only.

They run in three different colors: black, nude and white and cost $59.99 with Free shipping

You can wear these on any occasion or style.


UnderTech UnderCover Women’s Concealed Carry Bootcut Leggings

Product

UnderTech UnderCover Women’s Concealed Carry Bootcut…

Top Pick

  • Two handgun holsters in your choice of right or left hand draw
  • Front accessory pocket on opposite side of holsters – perfect for…
  • Two stylish and functional zipper pockets
  • 90% Supplex Nylon, 10% Spandex
  • Inseam Length – 29 Inches

Our rating

Details

  • Two handgun holsters in your choice of right or left hand draw
  • Front accessory pocket on opposite side of holsters – perfect for…
  • Two stylish and functional zipper pockets
  • 90% Supplex Nylon, 10% Spandex
  • Inseam Length – 29 Inches

If you don’t enjoy tights, Undertech got your back with bootcut leggings.

Made with 90% Supplex nylon, these leggings feel like cotton while drying quickly.These bootcuts offer a looser fit while still hugging the body. They also have two holsters, one in the front at the appendix and one in the rear at the kidney position.

As an added feature, you have a secret pocket for cash, keys or small items such as your carry permit. The holster locations depend on your dominant hand, so make sure to choose the right version for the type of carry that you plan on using.The bootcut leggings are perfect dress pants with ample inseam for long legs. They will cost under 90$ with free shipping, making them on the more pricey end of this list.


UnderTech UnderCover Women’s Concealed Carry 101 Jeggings in Burgundy

Product

UnderTech UnderCover Women’s Concealed Carry 101 Jeggings in…

Top Pick

  • Two holsters – one in front and rear
  • Holsters include retention strap for safety and security
  • Holster can also be used to carry a cell phone
  • Able to carry & conceal most self-defense handguns. Available in…
  • Hidden waistband pocket stashes cash or a key. Four-way stretch…

Our rating

Details

  • Two holsters – one in front and rear
  • Holsters include retention strap for safety and security
  • Holster can also be used to carry a cell phone
  • Able to carry & conceal most self-defense handguns. Available in…
  • Hidden waistband pocket stashes cash or a key. Four-way stretch…

UnderTech Undercover also offers burgundy jean style leggings. It’s a step up from regular carry wear and has added look of quality.The  classy burgundy red style  comes with 2 holsters: one at the front and one at the rear. These jeggings are designed for right-handed shooters only so please consider a different option for lefties.Like other Undertech pants, all holsters have a retention strap to secure your weapon and reduce draw time.

Also, there are extra pockets for your phone or accessories. This is an excellent option for a night out in the city with the comfort of your weapon. The jeggings are for sale for $99.00 with Free Shipping.


Graystone Gun Holster Shorts Concealed Carry Compression Women’s – Concealment Spandex CCW Clothing with Two Glock Pockets

Product

Graystone Gun Holster Shorts Concealed Carry Compression…

Top Pick

  • Graystone
  • Misc.

Our rating

Details

  • Graystone
  • Misc.

The graystone shorts have the right mix of stretch and strength with polyester and spandex. The material offers great mobility and you’ll forget you were even wearing them. These shorts are also worn a little higher over the belly so check the pictures before you buy. There are two holsters in the back and you can easily wear jeans, dresses or any other outfit.

You only need a shirt to conceal your weapon without giving up comfort.The shorts come in black and white at $34.99 or $59.99 with free shipping for both options.


UnderTech UnderCover Women’s Concealed Carry Short Shorts

Product

UnderTech UnderCover Women’s Concealed Carry Short Shorts

Top Pick

  • This Compression Concealment Short Shorts Holster is made…
  • FITS MOST HANDGUN BRANDS: Glock, Smith and Wesson, Revolver,…
  • Shorts are AMBIDEXTROUS – 2 easy-access holsters on each side of…
  • Made in USA
  • Micro/Polyester fabric blend.

Our rating

Details

  • This Compression Concealment Short Shorts Holster is made…
  • FITS MOST HANDGUN BRANDS: Glock, Smith and Wesson, Revolver,…
  • Shorts are AMBIDEXTROUS – 2 easy-access holsters on each side of…
  • Made in USA
  • Micro/Polyester fabric blend.

After the success of concealment shorts, Undertech created even shorter shorts for law enforcement officers that will do nicely for civilian concealed carry as well. You’ll be the only to know you’re carrying even when you’re out for a run or wearing short skirts.

Despite a 2” inseam, the shorts have enough room to secure to handguns and a retention strap over the handle. Like the original shorts, there is plenty of elasticity in the material to fit different body types. You can wear these under form-fitting clothes without a noticeable print.

If you’re ready to give up holsters or unsightly gun belts, these shorts have the right concealment factor with silky smooth texture for your comfort.

They’re only offered in black for now and depending on size will cost between $54-$59.99 with free shipping.


UnderTech UnderCover Women’s Zip-Pocket Concealed Carry Leggings in Olive Green

Product

UnderTech UnderCover Women’s Zip-Pocket Concealed Carry…

Top Pick

  • Two handgun holsters in your choice of right or left hand draw
  • Front accessory pocket on opposite side of holsters – perfect for…
  • Two stylish and functional zipper pockets
  • 90% Supplex Nylon, 10% Spandex
  • Inseam Length – 29 Inches

Our rating

Details

  • Two handgun holsters in your choice of right or left hand draw
  • Front accessory pocket on opposite side of holsters – perfect for…
  • Two stylish and functional zipper pockets
  • 90% Supplex Nylon, 10% Spandex
  • Inseam Length – 29 Inches

Here is a new release of the original concealment pants with extra functional zip pockets.

Also, these leggings sit up higher for a flattering look.

If you ever struggled with unwieldy gun belts or holsters, this is another option for daily carry.

The olive leggings have 2 holsters at the front appendix position and kidney position at the back.

These olive leggings included the patented retention strap so you never have to worry about dislodging your weapon.

If you’re tired of black and white, this a great addition to add variety to your carrywear while looking great.

Just like previous UnderTech products, these leggings look and feel like brand-name leggings.

They currently retail for under $80 with Free shipping included.


Parting Shots…

As the demographics of gun ownership change, more carrywear manufacturers will enter the market.

Female gun owners are demanding more specialized accessories to satisfy their needs.

This leads to a vast selection of new products and brands.

We understand it can be confusing to sift through multiple reviews, demonstrations and product descriptions to find the right fit for your body type, style and still keep you safe.

Not all holsters are created equal: you will need something that fits you, your firearm, and your lifestyle.

After all, you need a holster that secures your weapon, allows for quick draw and still look discreet: there’s no point in concealed carrying if you’re ether too uncomfortable to carry at all, or if the world can tell that you’re carrying.

With more and more women concealed carrying for their own defense, there’s a burgeoning industry of female oriented products so that women aren’t forced into wearing men’s clothing or holsters in order to exercise their rights. Pants and shorts like the ones on this list look  basically like normal leggings or shorts: no on will even know you’re carrying and that is one of the main criteria one ought to look for in deciding on a concealment garment. So, take a look at the products on this list if you want a little guidance on where to begin in the concealed carry game.

The post The Top Rated Womens CCW Pants of 2019: Keep Your CCW Comfortable appeared first on GunBacker. Kudos and many thanks. We’re just paying it forward when we think it’s worth it.


Other self-sufficiency and preparedness solutions recommended for you:

Healthy Soil + Healthy Plants = Healthy You

The vital self-sufficiency lessons our great grand-fathers left us

Knowledge to survive any medical crisis situation

Liberal’s hidden agenda: more than just your guns

Build yourself the only unlimited water source you’ll ever need

4 Important Forgotten Skills used by our Ancestors that can help you in any crisis

Secure your privacy in just 10 simple steps

Gun ownership is on the rise for American women. Concealed carry experts recommend carrying your weapon on your body at all times for self-defense. This recommendation rules out purses, handbags and