Home2018May (Page 2)

A lot of people plan to bug out if the SHTF with all of their survival gear stowed in their vehicle or pulled in a trailer. What if you have to turn around quickly? Do you know how to swing that trailer around so that you don’t get stuck? Can you execute a turn on a blocked road so that you aren’t trapped in an ambush?

This is what I was thinking as I watched my neighbor this weekend. I was mowing our yard which is my favorite twice weekly activity this time of year (not) and my neighbor was working in his yard. He had hauled a little potting soil for some plants he was planting in a small trailer attached to the back of his SUV. The trailer was one of the less substantial types, perfectly suited for small jobs like hauling a washer and dryer but as he finished I watched him drive up the street to turn around. He pulled into a driveway and attempted the first backup. It was obvious he hadn’t given himself enough room or the trailer wasn’t straight enough and it quickly was wedged at a 90 degree angle to his car.

I watched him attempt this a couple of additional times and then finally, he stopped the car, got out and unhitched the trailer. It was when he unhitched the trailer that he realized that he had stopped on a hill and he quickly started jogging down the hill all the while trying to navigate his trailer into a position where he could back up his SUV, reattach and go back home.

What if this was you and you had hundreds, maybe thousands of pounds of stored food, ammunition, tarps, generators and survival gear piled onto the trailer. Could you turn this around without getting out of your car? How many attempts would you have to make to get the trailer and your vehicle pointed in the right direction? Could you do this under duress?

Backing up a trailer isn’t hard, but it does take practice. I like to lump this into the same category as sweating pipe. The concept itself is simple, but unless you know how to finesse the materials you will probably screw it up a couple of times. This is the main reason why I go ahead and call a plumber if I decide to get my handy-man hat on and mess around with anything on the back side of the wall in our bathroom or kitchen. If I ever build a new house I swear everything will be PEX.

Backing up a trailer is easier to do if you can see your trailer in my opinion, but that is probably because I don’t have any other experience. I do know that we have some professional truck drivers who follow this blog who are probably laughing right now and I am counting on for their comments below.

The Approach

Backing a trailer into a specific spot at a specific angle is mostly in the set-up. Like most things, preparation is key.

First things first: roll down your windows. Driver’s side and passenger’s, and it doesn’t matter if it is raining. If you have a passenger, it is best to kick them out before you even approach the actual boat launch, driveway, or campsite. You are probably going to want a spotter anyway, and they will either distract you or block your view if they stay in.

Forget about your rear view mirror, and don’t turn around and try to look out the back window. Chances are, you can’t see much over your trailer, and who cares what the front of that trailer is doing? You want to make sure your side mirrors are adjusted properly, because they are going to show you where the sides of your trailer are, allowing you to deduce what the back is doing. It may be more showy to do the big turn around and hug the back of the seat thing, but how much cooler to pull up and back that baby in without turning around? Appearances aside, it really is the proper way to do it. Proper mirror adjustment means when your rig is straight, your trailer is visible in about the inside third of your mirror. It is good to be able to see your trailer tires. This gives you a good view of where you are going and how you are doing.

Now you are almost ready to approach. For the sake of a consistent example, let’s say you are backing a camper into a campsite. It is coming up on your right-hand side. Stop short and get out of your truck. Go check for obvious obstacles that you will have to avoid. Don’t forget to look up. Even if you have a straight shot to the back of the site, will you clear all the tree branches? This sounds like retentive health and safety advice, but backing over a stray chunk of firewood or someone’s leftover wire roasting stick is going to be a rough start to your weekend. Try to make a mental map of where the picnic table is in relation to the fire pit and the back of the site. Pace off distances if you need to (you do know how wide your camper is, don’t you?). Have your passenger(s) stand near major obstacles so they can shout if you are too close. You may not always be able to see them, but your windows are already rolled down, right?

The Right Set-up

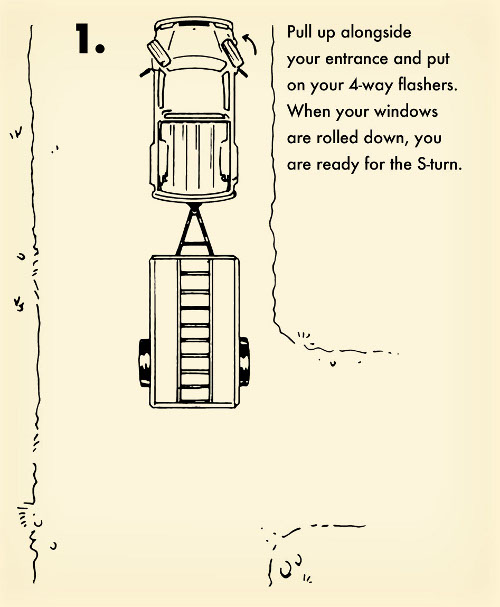
The moment of truth is at hand. If you do this next part wrong, it doesn’t matter much what you do after. Get it right, and you will look like a pro. It is the S-turn. You are in a forward gear with your campsite coming up on the right. Get that vehicle over to the right as far as you can without hitting something or rolling into the ditch and pull up alongside the entrance. How far along you go really depends on how long your rig is and what kind of hitch you have, but probably somewhere around when your truck bumper is coming up on the far end of the entrance, you want to swing out left. Don’t go all the way. Before you drive into the left side ditch, crank it back to the right. This will make the smaller angle between the truck and trailer be on the right-hand side. Stop with your truck somewhere around midway between road shoulders. Congratulations, your trailer is ready and begging to be backed into the sweet spot.

The Moment of Truth
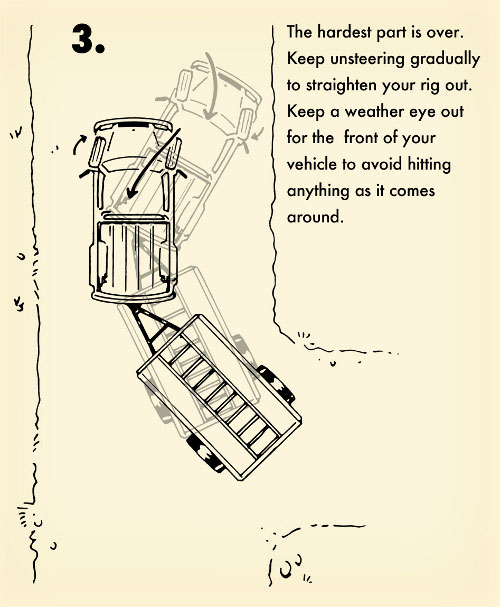
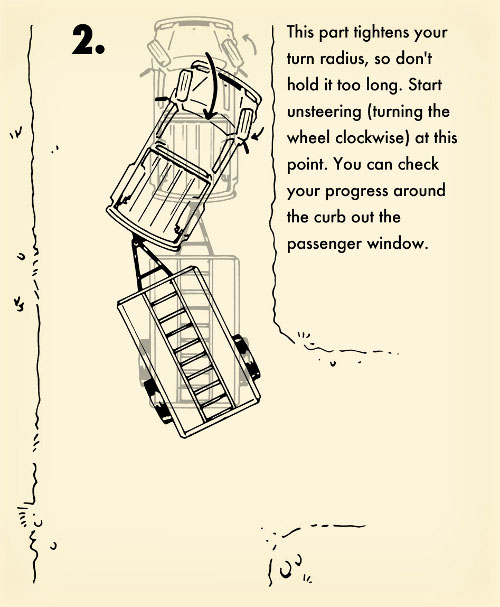
The next part is where everyone gets nervous. People will offer “helpful” advice here, about how the steering wheel works in reverse now, but I’ve seen people start thinking everything in their vehicle works backwards and forget which pedal does what. So, take a deep breath and imagine you are a kid playing with toy trucks. You will probably need to make your turn angle a bit sharper, especially if you have a narrow entrance or a longer trailer. To accomplish this, turn your wheels as though you were going to steer to the left if you were going forward. Don’t turn it all the way. Put the truck in reverse, and let off the brake. Stay really calm at this point and constantly ask yourself “Is the right thing happening at this instant?” If the answer is yes, don’t change anything. As soon as the answer is “No,” stop. You aren’t going fast (I hope), and hopefully you didn’t choose a busy spot for your first attempts.
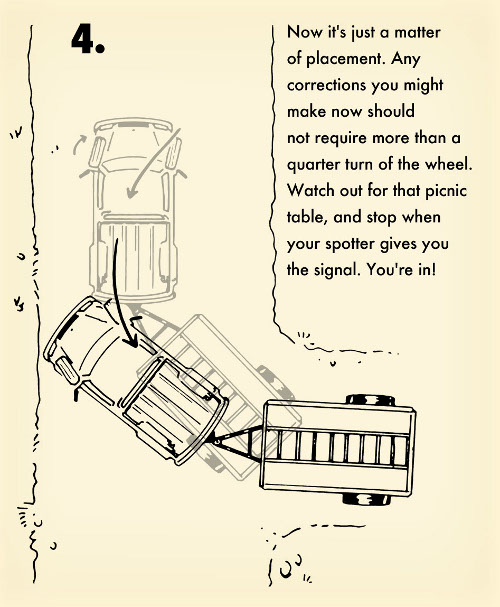
So, you are in reverse, with your wheels pointed left, causing your trailer to turn sharper. You won’t be able to keep that up for long before you fold your rig like a jack knife. It only takes a little distance to do what you need here. It is kind of like putting a crease in a piece of paper, where you only need that instant of pressure to kink it over. After that, you can lighten up and it will stay. So, after a couple feet (literally), start turning the wheel to the right. Think of following the trailer with the truck. My trainer always told me once I had the kink to “follow the trailer around.” Turning your wheel to the right will begin to straighten out the whole rig. I always think of it as “unsteering.” How soon you do this, and how sharply you turn depends on the relative sizes of everything. One of the biggest mistakes people make in reverse is over-correction. If the trailer starts going one way or the other, don’t crank the wheel all the way over. Unless you are in a really technical spot, needing to crank the wheel more than 180 degrees probably means you need to pull ahead and try again. Never shout when a whisper will do.

Words of Warning

Throughout this exercise, keep an eye on what the front of your truck is doing. Watch for ditches and obstacles. I once blew a steer tire on a set of stairs because I was too focused on the back end. This is another reason to back up like a man, using your mirrors, not wrapped around your seat trying to see out the back window.

Don’t be afraid of taking multiple runs to get into your spot. Obviously it is better to take a few runs and get it right than to hit something first shot. Some spots require multiple runs no matter how good you are. Also, don’t be afraid to put it in park, get out, and walk around to see what the back end is doing and how close you are to that fire pit. I did this constantly, even once I had some skill and confidence.

A word is necessary here about having someone “guide” you into a spot. Don’t. Having people to help is great, but give them specific jobs. Just like you have a limited perspective from the driver’s seat, they will have a limited perspective on what the far side of the trailer is doing. Tell your helper something like, “Stand so you can see my face in the side mirror of the truck and let me know if it looks like I’m going to hit the fire pit.” If they can’t see you, you can’t see them. Give them a specific signal that is verbal (your windows are still rolled down, right?) and visual. Inexperienced guides will usually run eagerly to the back of the trailer and start waving incomprehensibly while standing somewhere you can’t see and then yell after you’ve run over the picnic table.

Please practice this before you get to the boat launch with your new boat. Get your wife or your kids to come out and practice spotting you while you back up. How great will it be to pull up and have everyone know what to do? Don’t be that guy with the shiny new boat weaving and winding your way down the boat launch stressing everyone else out.

A lot of people plan to bug out if the SHTF with all of their survival gear stowed in their vehicle or pulled in a trailer. What if you have

It’s that time of year! Time to break out all of your summer clothes and put away all of your winter gear. Spring cleaning is a great time to clear away the cobwebs, freshen up everything after a long winters snooze. For the Prepper, it’s an excellent time to make sure your survival gear is in top shape and ready to do what it was designed to do and that is save your life. One of the more common pitfalls of a prepper is failing to resupply gear that has been used or waiting until items are grossly out of date which does you no good if they turn to dust right when you need to depend on them.

In this article I am going to list several different areas of focus that should get your attention at some point. Perhaps, spring cleaning can be a ritual for you and your family in terms of prepping supplies as well as pruning shrubs.

Make Sure Your Get Home Bag can still get you home.

My Get Home Bag is in my car and goes with me just about everywhere. Since this handy dandy set of equipment is always right behind my seat, it is easy to get to. This usually is a great thing, but in some cases it is too convenient. The other day we broke into the MRE I had stored in my GHB to stave off a hungry child. This was good for a couple of reasons. First, it allowed me to check my bag and make sure everything was still in there, but secondly, we got to eat some of our survival food and my daughter found that she liked it. My daughter had some of the snack crackers (think combos) and mixed up some lemonade for her water. After that the hunger monster was gone, but now my GHB was starting to get picked apart.

In my get home bag, I mainly have some basic necessities to make it home from anywhere I am going to be on a normal day. This is an MRE and water bottle with some first aid supplies, ammo and minor pieces like dust-mask and work gloves, duct tape etc. Use this time to refresh your water and rotate out any food you have in there. My MRE hasn’t been been out of my bag for 2 years. Two years is nowhere near the expiration date, but now my meal is missing some pieces. I want to take this time to go back over my get home bag and make sure I am not missing anything else, top off supplies and make sure that your needs/purpose for your bag haven’t changed. If you have a different scenario now, your bag’s contents might need tweaking.

Show your First Aid Kits a little love

I like to pride myself on having a first aid kit with me almost all of the time. This has come in use for all manner of little incidents and minor needs. I will take a smaller kit with me whenever we go on day hikes and the larger kit goes on any overnight car trips. Once you start taking a band aid here and some Tylenol there and an ace bandage here and some missing latex gloves, your kit starts to lose its effectiveness.

You can use this time to make sure that the contents of your first aid kit are fresh and up to date. Replace any expired medication now while you are thinking about it. I know that the expiration date is not necessarily an indicator of whether or not the medicine is still good, but it is best to have the freshest medication you can. Add back in supplies that were taken out, like the extra gauge, or bandages. Make sure you have new rolls of tape and moleskin for blisters and just like with your Get Home Bag, analyze your contents. If there is something missing in here that you have been meaning to add, now is the perfect time.

Un-Hide your Food Storage

Rotate, Rotate, Rotate is the mantra of any good prepper, but I find that stored food is probably the hardest thing to keep an eye on without a very good system for rotating your food in place. It is easy to buy cans of food that sit in the back of your pantry lurking there for years. These need to come to the front and be used. The important goal is to use your food storage as part of your daily diet, but some purchases don’t always make the best choice with an average family meal.

We have #10 cans of fruit that we purchased from Costco that still have plenty of life left in them, but I don’t want to forget they are there until the expiration is 2 years past. It may be time for a huge pie, or 4. I also have wheat stored that I want to check on and I can use this time to inventory my food to make sure we haven’t forgotten to replenish anything. I will also check on our canned vegetables and make sure they get used before this year’s crop is ready so we have the freshest canned foods possible.

Come on in, the Water’s fine!

No, I am not talking about the freezing temperature of your pool on Memorial Day, but we do need to ensure our water is in the best shape possible. Yearly, I like to pour out my stored water, usually in the flower beds or garden and fill up my containers with fresh water. I do this to make sure there is no mold or anything nasty growing in there, but it also keeps the stores fresh and better tasting. This is a simple task, but depending on how much water you have stored, could take a while.

While you are at it, make sure your filters are clean if you have a Berkey type filter mechanism and check your back-up filters. I have some camping filters we use so this is a good time to service those tools and make sure they are ready to go.

If you have bleach stored for treating water, make sure your bleach isn’t older than dirt. Bleach will start to degrade after about 6 months, so if yours is older than this, work that into your laundry rotation and buy some new for the pantry.

Have the sharpest tools in the shed

Spring is a good time to make sure any mechanical tools or implements you plan to depend on in a survival or grid-down type of scenario are working too. If you have a generator to use for power outages, take some time to fire it up and make sure it is working well. If you don’t have a supply of oil and fuel for your generator go out and get some now before you need it.

I also like to do a battery inventory at this time and make sure I have my minimums on hand. I also go around the house and find all of the rechargeable batteries and make sure they make it back to their charging stations so they will be ready for power disruptions and not game controllers.

Spring is a good time to go over your gear with a fine tooth comb also. If you have holsters for your gun or vests to carry your ammunition and ballistic plates, make sure they are clean and serviceable. Repair any frayed edges and ensure that when you need it your gear is ready for you. If you have individual first aid kits, make sure these are freshened as we mentioned above.

I normally do this much more frequently but if you have knives, axes, hatches or chainsaws, now is the time to get those blades sharpened. It is a good idea to have a spare chainsaw blade on hand anyway, but your hand-tools will need a little TLC to maintain their sharp edge. It might also be a good idea to make sure your heavy hand tools like rakes, shovels etc. are free of rust and ready to take a pounding.

Weapons Check

This should not be something you have to worry about but I will say it just in case. Your weapons should have been put away the last time you used them in a clean, oiled and ready state. If for some reason, you failed to do this, it’s time for a cleaning party. Get all of your weapons out and perform a good thorough cleaning. Yes, this means breaking them down and getting all of that carbon out of the nooks and crannies. If you are running short on cleaning supplies, this is a good time to restock those as well.

Additionally, make sure your extra equipment is functioning properly. Replace batteries in weapons lights and scopes and make sure you have spares on hand. While you are at it, go to the range if you haven’t been in a while. Yes, you will need to clean them all over again, but the last thing you want to happen is a weapons malfunction because you have been lazy with training or cleaning.

Vehicles

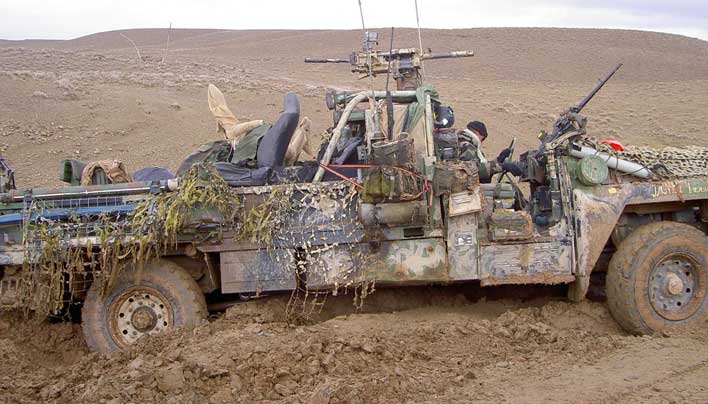
Most of us keep the basics of car maintenance covered, but you should make sure that your car is running in good condition and fix any minor issues you have been delaying. Even things as simple as new wiper blades, replacing fluids, oil changes and making sure your tires are inflated properly have positive effects on your ability to get out of dodge if needed. For most of us, our vehicle is what we will depend on to either get us back home or get us as far away from home as possible, so make sure your car is up to the task.

Another item to check is your automotive kit if you have one. We have “survival water” that my family likes to use when they are thirsty. Nothing wrong with that as long as it is replaced every time it is used. We also have first aid kits and blood stoppers, flashlights and other preparedness items that should be checked for freshness and to make sure we haven’t forgotten to resupply.

Fuel

Now that you have your car ready, its also good to check on your fuel storage and make sure that you didn’t forget to fill any cans from over the winter. Make sure your fuel is treated for long-term storage if you haven’t and rotate any fuel that is over a year old if you want the freshest mix you can have. If you have been meaning to stock up another 5-gallon can or two go out and get those also. You will be glad you did.

I have a spare propane tank in my shed for backups when I need them. Now that it is grill season again, I expect to be needing that spare tank soon, because my fuel always runs out right when I have a whole bunch of meat half-way cooked. With my spare in the shed it is only 3 minutes to flames again and the day (and expensive meat) has been saved again by preparedness.

When I use this spare tank though, I make it a point to stop the next day and get a new spare so that I always have one in reserve. If the power goes out, we can always cook on the grill while we have propane before we have to resort to our other cooking methods when the grid goes down.

Home

Lastly, check out your home defenses. Do all of your window and door latches work properly? Have you lost any keys this past year and haven’t replaced the locks? Are your fire extinguishers charged fully or do they need replacing? What about your smoke detectors and carbon-monoxide detectors? Do you have fresh batteries in there?

There are a ton of things to consider but hopefully, this gives you some ideas that you can use to make sure your preps are ready when you need them. If you have other ideas, please add them in the comments below.

It’s that time of year! Time to break out all of your summer clothes and put away all of your winter gear. Spring cleaning is a great time to clear

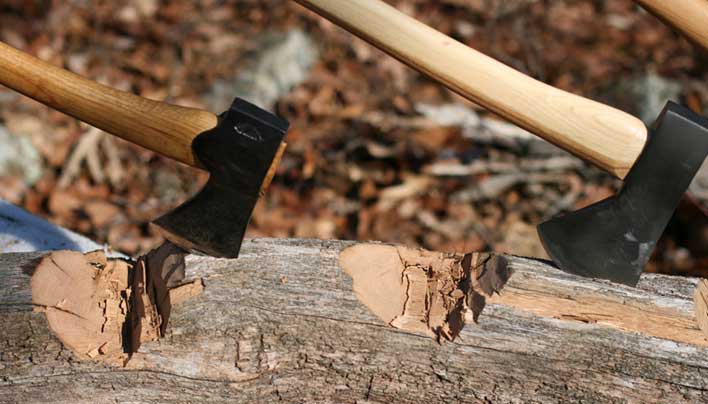
Axes can be used for so many tasks in a survival or camping situation. Like any tool, especially one with a sharp edge it is important to know how to properly use this piece of equipment if you don’t want to end up with a trip to the ER or worse. Knowing how to use an axe could reduce the amount of work you need to do and keep you safe at the same time. In the two videos below, Survival expert, Ray Mears explains how to use a typical medium sized axe to chop wood safely and efficiently. He also goes into the basics of axe care so your tool will stay in excellent shape for years to come.

Axes can be used for so many tasks in a survival or camping situation. Like any tool, especially one with a sharp edge it is important to know how to